support

How to use video

Basic operations
Basic operation ① Create index labels
Operation Manual
Operation Manual ① Font size specification
Operation Manual 2: Changing the font size and font later
Operation Manual ③ Copy and Paste
Operation Manual ④ Automatic input of sequential numbers
Operation Manual ⑤ ・How to enter (Nakaguro)

How to set the ink ribbon cassette

Title Brain compatible labels

  • Indexes and folder labels
    Index and
    Folder Label
  • Supplies, floppy disks, address labels
    Supplies and
    Floppy disks, address labels
  • Index and cover labels
    Index and cover labels
  • Name, identification, video label, etc.
    Name and identification,
    Video labels, etc.
Paper labels, resin labels, etc. depending on the application
We have over 100 varieties available.

Download Title Brain Compatibility Chart (PDF)

FAQ

About Title Brain

Title Brain is a label printer that supports over 100 types of Kokuyo pre-made labels.
It can print directly on index labels, round labels, equipment labels, etc.
Operation is simple; just enter the sheet number of the label you want to use and enter the text.
The printer will then automatically adjust the font size and pitch to fit the label dimensions and print.

Tape printers use special tape-shaped labels and are versatile, but they cannot print directly on labels such as index labels.
Title Brain allows you to print directly onto labels that you would normally handwrite.

*KOKUYO labels with the Title Brain compatible mark can be used.

While OA labels are convenient for printing large quantities of labels, such as mailing labels, they are not ideal for creating one or two labels or printing on partially used sheets. Additionally, there are inconveniences, such as having to carry the labels to the printer's manual feed tray and wait for your turn to print.
With Title Brain 2, you can not only create labels on the spot whenever you want, but you can also print on partially used sheets down to the last piece without wasting any.

About Title Brain 2

We have over 100 types of labels, with different shapes, materials, and adhesives. Label types include paper labels, resin labels, and recycled paper labels. Adhesives are available in strong and removable types.
Learn more

It cannot print on labels from other manufacturers. It only supports Kokuyo pre-made labels.

Color ink ribbons are available in red for paper use.
Resin is only available in black.

Title Brain 2 has a built-in storage capacity of approximately 2,000 characters. By loading saved files as needed, you can avoid the need to re-enter the characters.
In addition, files created on the main unit can be temporarily stored on a computer using the included dedicated application software.

*The number of characters that can be registered on the main unit will be reduced depending on the label type and input status.

This video shows you how to set the ink ribbon.

Approximately 30 sheets (12 labels per sheet) can be printed.

*When printing 28 SS characters (7 characters x 2 lines x 2 columns) on one label using Tar-21 (sheet no. HV). The figures are actual measurements taken by our company.

It can be powered by AC100V or six AA alkaline batteries.
When using AC100V, be sure to use the dedicated adapter included.

*Batteries are sold separately.

Approximately 30 sheets (12 labels per sheet) can be printed.

* When printing 28 SS characters (7 characters x 2 lines x 2 columns) on one label using Tar-21 (sheet no. HV). The figures are actual measurements taken by our company.
This guideline will vary depending on input time, number of characters, character size, decorative character settings, number of prints, etc.
Please note that there may also be some variation depending on the batteries used.

Input operations on the Title Brain 2 console

You can create labels up to a total of approximately 500 characters, regardless of whether you are creating one or multiple labels.

*The number of characters that can be entered may be reduced depending on the label type and input status.

When entering two-digit numbers in vertical writing, please use half-width characters. If you enter full-width characters, the numbers will be arranged vertically one by one.
* Characters of 3 or more digits are not permitted.

(Example) When entering "2005" vertically on both sides of the index label of TA- 21B (sheet No. HV).

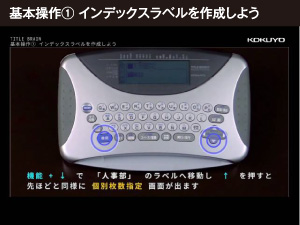
1) Turn on Title Brain 2, press the [Execute] key on "Create New", and enter "HV" on the sheet number input screen.

2) The layout editing screen will appear, so select the second from the left under "Same content on both sides" (vertical layout) and press the [Execute] key.

3) "Input screen A" will be displayed, so enter "Heisei".

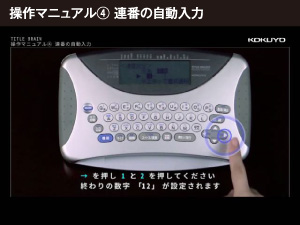
4) Next, while pressing the [Function] key, enter "1" and "2" in succession, and when they are highlighted in black, press the [Half-width Conversion] key. Make sure that the number is displayed as two digits on the screen.

5) Next, enter the "fiscal year" and your entry is complete.

Yes, it is possible.
Place the cursor on the first character you want to change, select the range (press the [Function] key and then the [A] key), use the arrow keys to highlight all the way to the last character, and press each key (half-width conversion, kana conversion, vertical/horizontal).

Title Brain 2 Printing

  • Please check that the sheet number is entered correctly.
  • Insert the sheet straight in the correct position (just to the left of the sheet insertion slot).

*For details, please refer to page 44 of the instruction manual.

About the application software

The files created by the Title Brain 2 console and the dedicated application software are in different formats and cannot be edited. However, you can back up files created on the console to your computer using the dedicated application software.

We support importing data in Excel and CSV formats. If you have an address book or other data you have created, you can save it in Excel or CSV format, and then import the file into your application software to layout the data on the labels.

[Note]
*Data can only be imported in CSV and XLS format. Other files cannot be imported.
* Only text information can be read.
*Processing speed may slow down depending on the amount of data loaded.
*Please note the following points when importing XLS format files.

  • To read this file, you need Microsoft Excel 5.0 or later.
  • The data that can be read is Excel
    This file was created in 5.0/7.0/95/97/2000/2002/2003/2007/2010/2013.
  • Do not use single quotation marks ('') in the sheet name. This will prevent the data from being imported.
  • Data is recognized starting from the second line. The first line contains the column titles.
    However, if the first row contains numeric data, the column titles will be displayed as F1, F2, etc.
  • Dates, currency displays, functions, etc. specified in Excel will not be loaded.
  • Please use data that has cell attributes entered as text in Excel.

*Microsoft and Windows are registered trademarks or trademarks of Microsoft Corporation in the United States and/or other countries.
All other company names and products names mentioned are trademarks or registered trademarks of their respective companies.

Connecting Title Brain to a PC

The latest version, Ver1.40, supports Japanese Windows Vista (32-bit) or later.
Japanese Windows 7/8/8.1/10 (32bit/64bit)/11 (64bit).
(PC with one of the above pre-installed)
For details, please check products information specifications.

*Not compatible with Macintosh.

Please use a standard AB type USB cable.

If you are connecting the Title Brain via a hub, connect it to the port closest to your computer.

*This may not be possible. In that case, please connect directly to the port without using a hub.

1) Turn off the Title Brain unit and unplug the USB cable.

2) Install SOFT TITLE BRAIN using the CD-ROM included with the Title Brain.

3) Connect the Title Brain unit to your computer and turn on the unit.

4) The "Add New Device Wizard" screen will appear. Click the [Next] button.

5) Select a search method. Check "Use the best driver for your device" and click the "Next" button.

6) A screen will appear asking you to specify where to search for the driver. Uncheck all the boxes and click the Next button.

7) The message "Search for driver files for the following device: TITLE BRAIN" will be displayed, so click the "Next" button.

8) When the message "TITLE BRAIN The software required for your new hardware has been installed" appears on the screen, click the [Finish] button to exit.

Please make sure that the Title Brain is securely connected to your computer. The auto power-off function may have turned the power off, so please check the power supply. If it's connected via a USB hub, try connecting it directly to your computer. If your computer has multiple USB ports, try connecting it to a different port. If you have any USB devices other than the Title Brain connected to your computer, try disconnecting them.
If printing still does not occur, please try the following steps:

⇒Operation Instructions (for Windows 11) (PDF) (Click to download)

⇒Operation Instructions (for Windows 10) (PDF) (Click to download)

Operating Instructions (for Windows 8.1) (PDF) (Click to download)

Differences from Title Brain (NS-TB1D)

While maintaining the same ease of use as before, editing has been greatly improved with a larger LCD screen, an improved built-in dictionary, and additional built-in fonts. Outline fonts are used for large characters, and the improved print resolution has resulted in clean printing with fewer jagged edges.
In addition, a function for connecting to a computer has been added, making it possible to edit labels using dedicated application software and back up the device's files.

*Backing up the main files is a feature only available in Title Brain 2.

*Title Brain 1 (NS-TB1D) / 3 (NS-TB3) / 4 (NS-TB4) are no longer available for sale.
■Please see here for FAQs regarding Title Brain 1, 3, and 4

The labels, ink ribbons, and carrying bags can be used with Title Brain 2 and Title Brain 3.
Adapters are not compatible, so be sure to use the dedicated adapter included.
Memory cartridges cannot be used.

The file format on the device is different, so the files cannot be reused.

*Memory cartridges are not compatible.

Differences between Title Brain 2 and Title Brain 3

The Title Brain 2 comes with a keyboard and LCD screen, allowing you to input and print labels using just the device. It can also be connected to a PC, allowing you to print labels created using dedicated application software.
Title Brain 3 is a model designed specifically for connection to a PC.
Both models have the same printing performance and compatible label types.

*Title Brain 3 is no longer on sale.

Kokuyo Stationery Language Switching