

 DOT LINER
Support Information
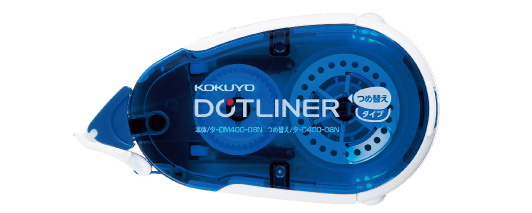
Storng Adhesive
TA- DM400-08N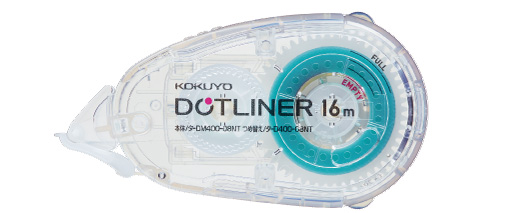
Storng Adhesive (transparent)
TA- DM400-08NT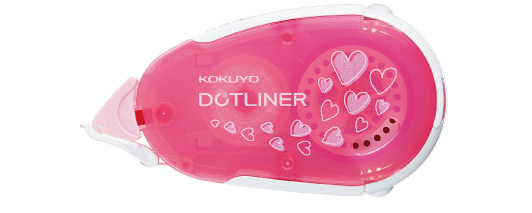
Storng Adhesive (heart pattern)
TA- DM405-08N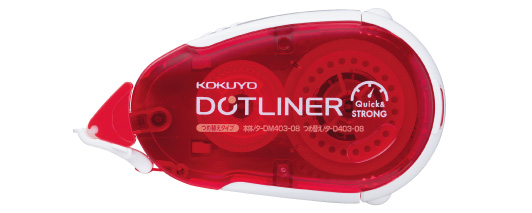
Apply strongly
TA- DM403-08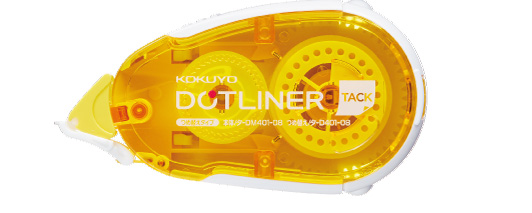
Removable Adhesive
TA- DM401-08
How to use
-
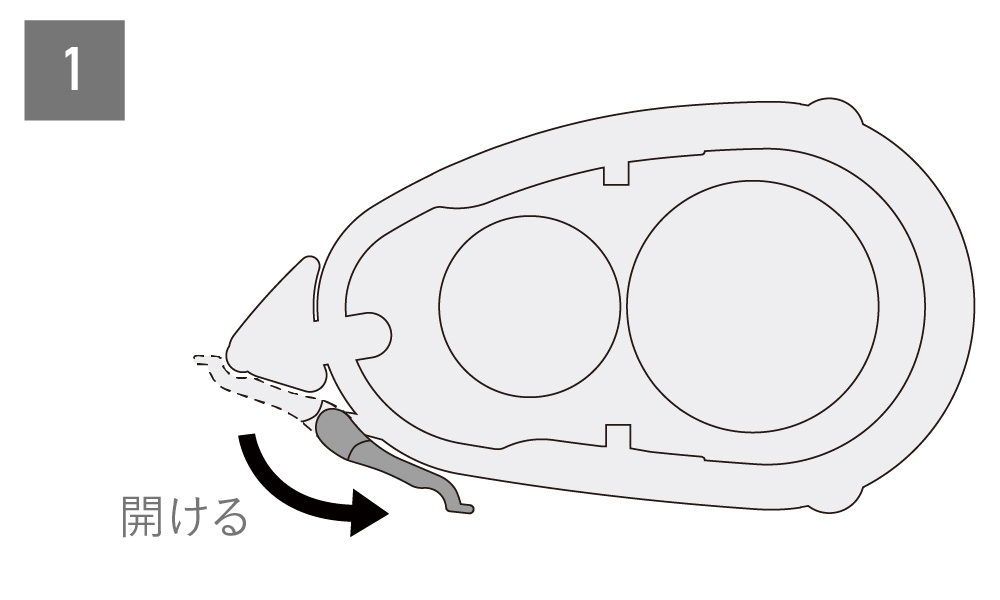
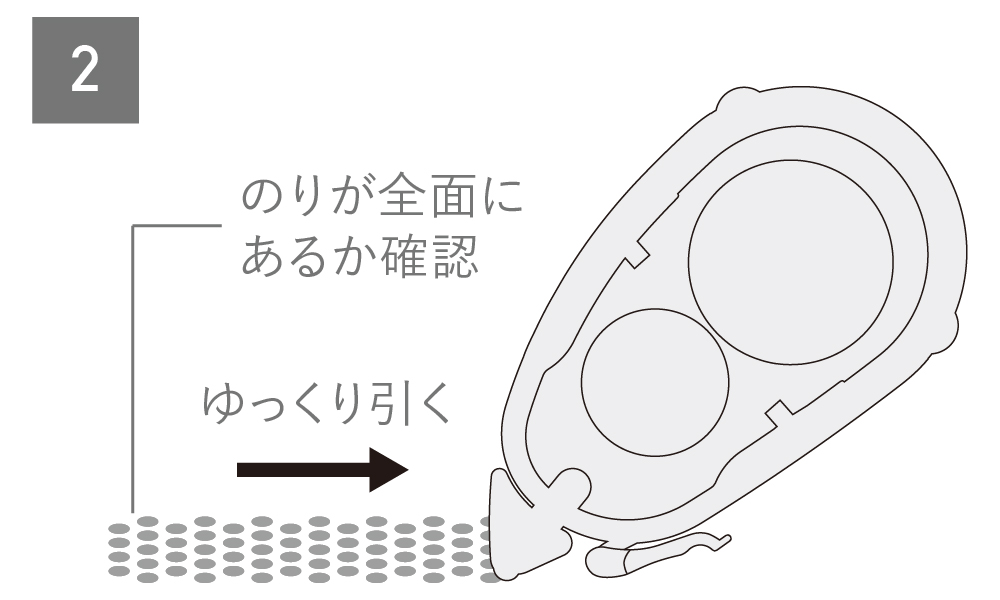
-
※注意:のりが転写されずに巻き取られると正常に動作しなくなります。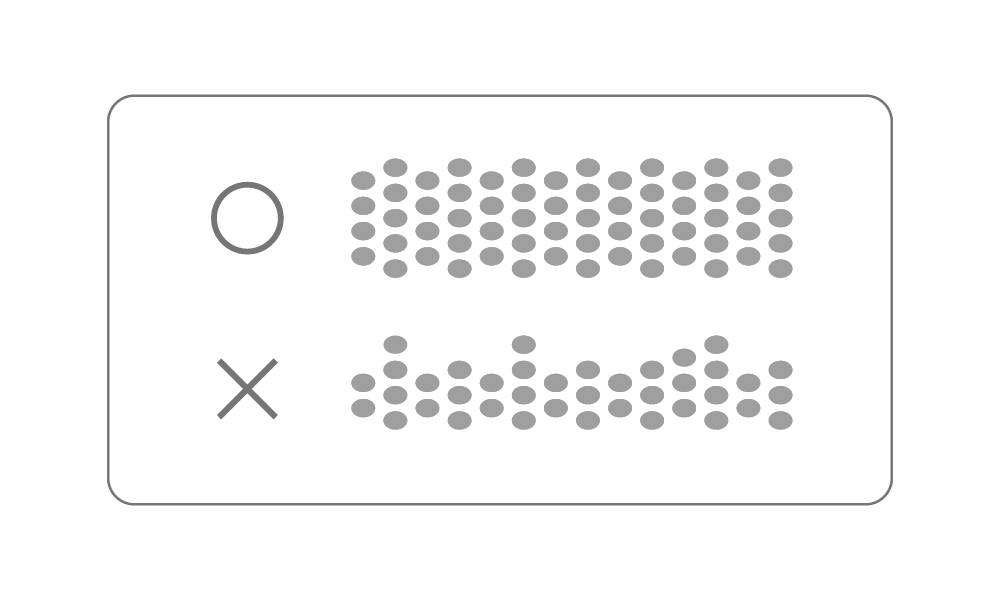
How to refill
-
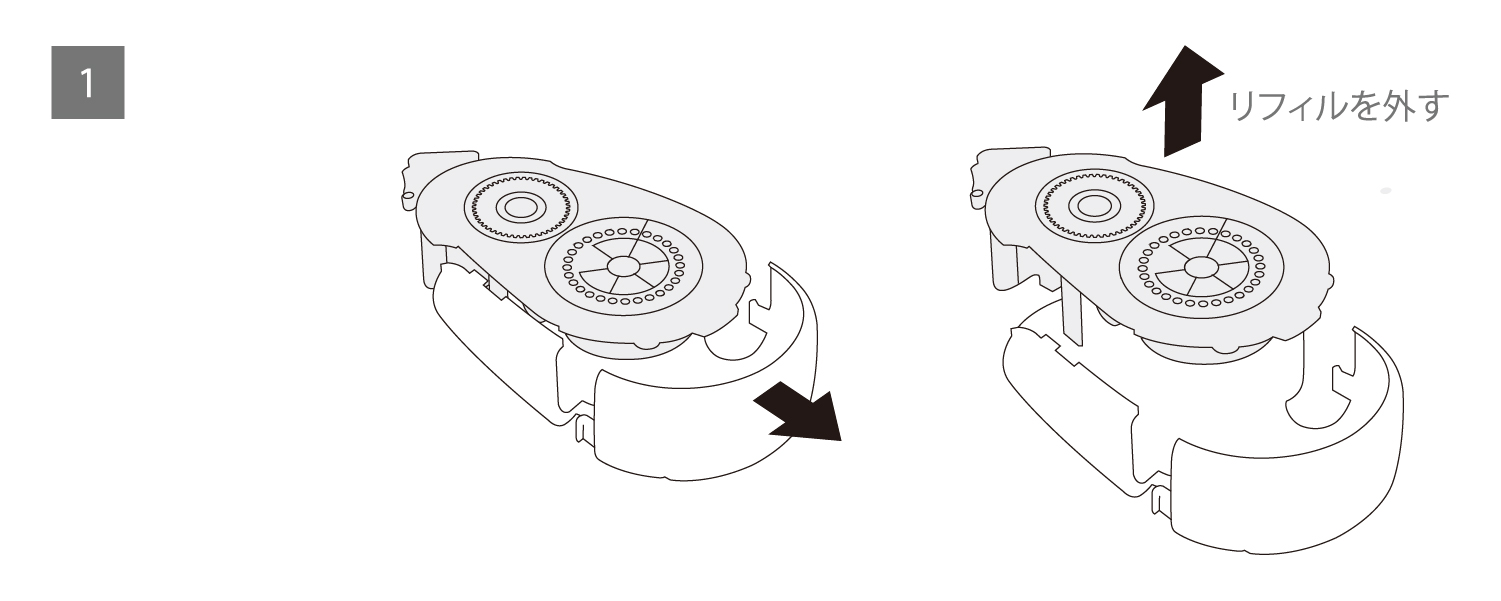
使用済みリフィルを取り出します。 -
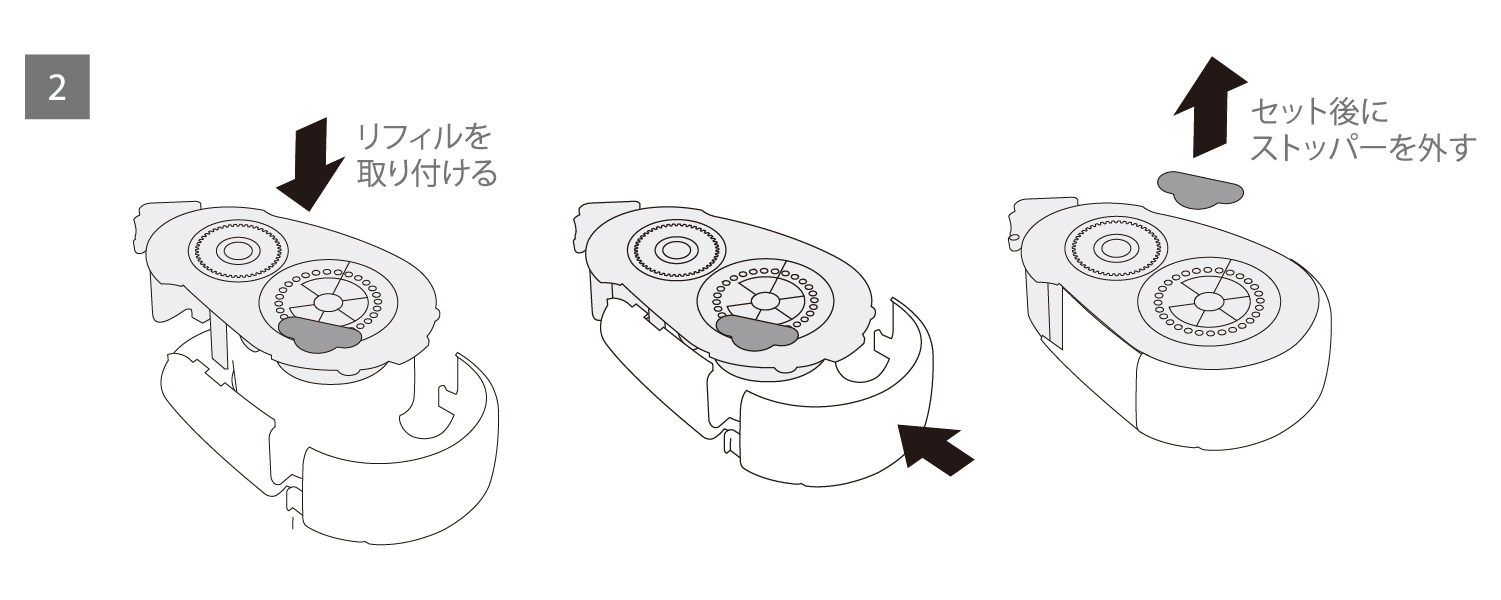
新しいリフィルを取り付けます。
If the tape is slack
-
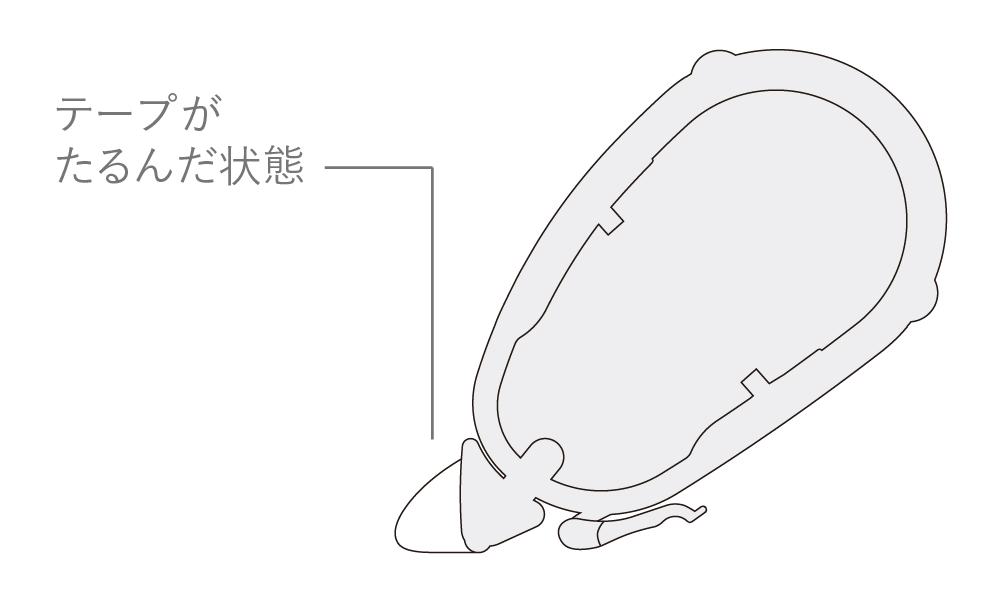
のり引きを止めてください。
[In case of small slack]
-
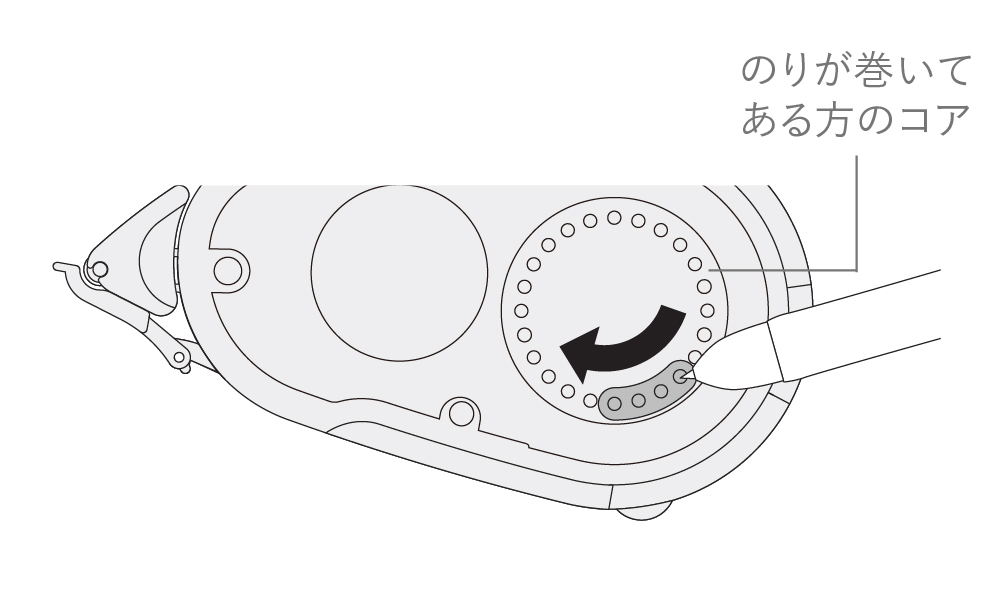
ペン先などでコアを時計回りに回してたるみを直してください。
[In the case of significant sagging]
-
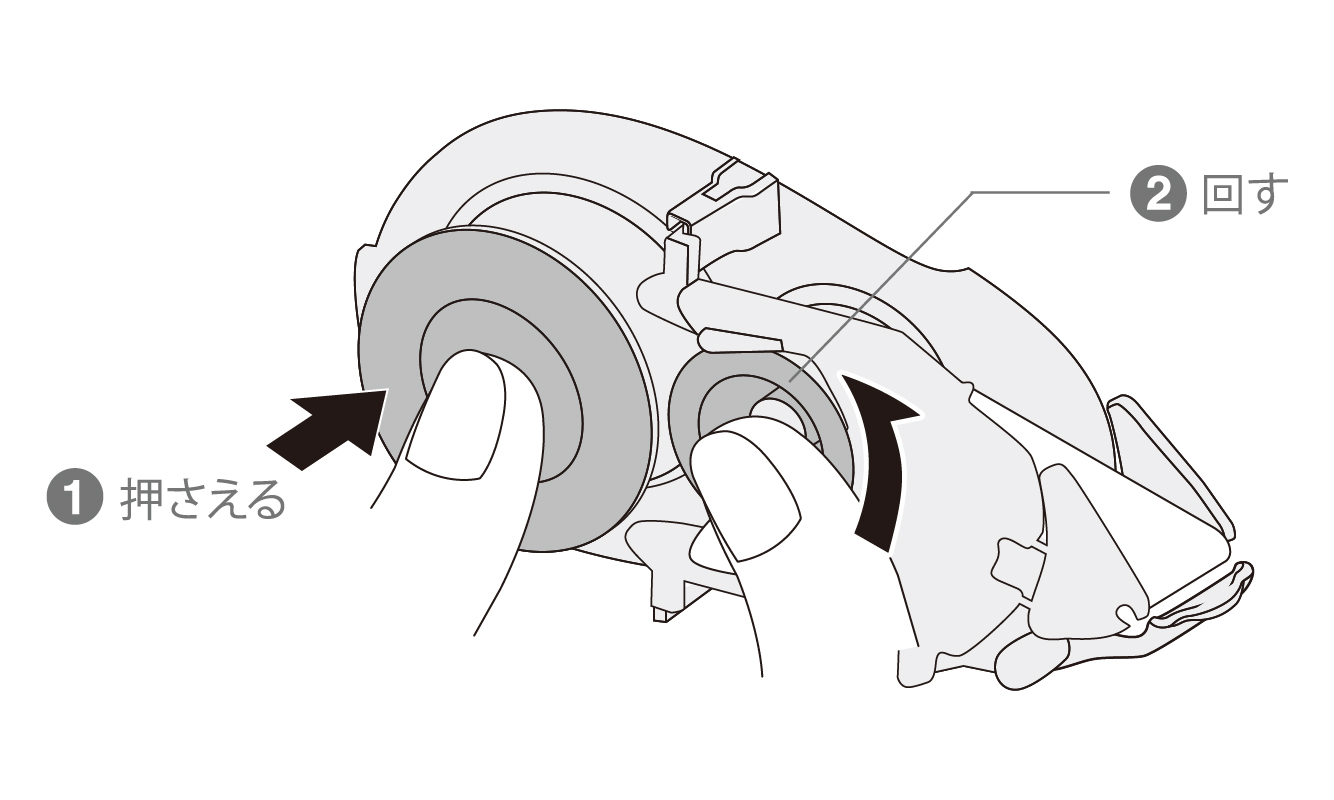
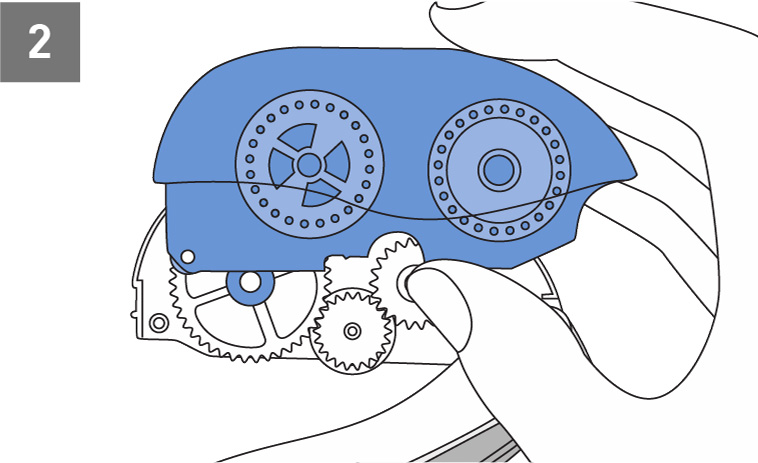
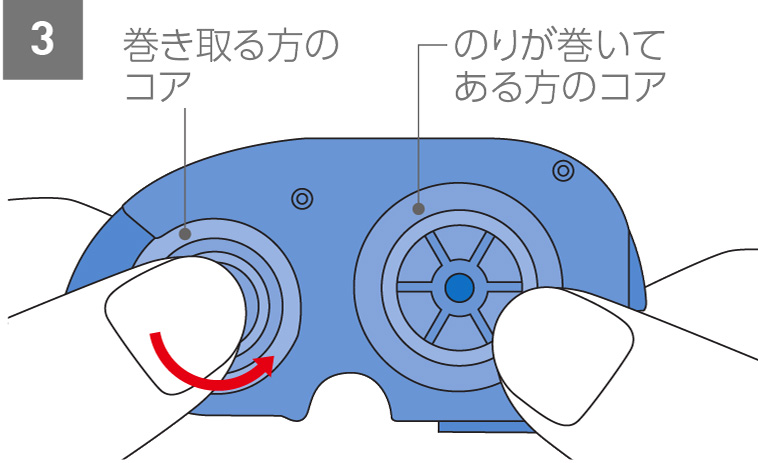
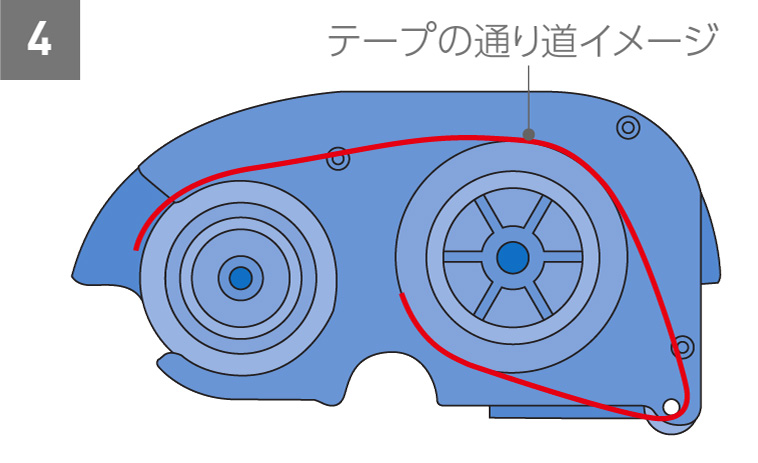
リフィルを取り出して、1、2の順でテープを張って、たるみを直してください
※注意:❶を押さえずに❷を回すとテープを巻き込み動かなくなります。
DOT LINER Wide
Support Information
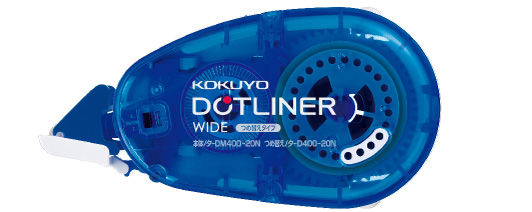
Storng Adhesive
TA- DM400-20N
List of refill tapes
- TA- D400-08N (Storng Adhesive)
- TA- D400-08NX3 ( 〃 3 Pack)
- TA- D400-08NX10 ( 〃 Pack of 10)
- TA- D400-08NX15 ( 〃 Pack of 15)
- TA- D400-08NX30 ( 〃 Pack of 30 pieces)
- TA- D400-08NT (transparent)
- TA- D401-08 (Removable Adhesive)
- TA- D401-08X10 ( 〃 Pack of 10)
- TA- D403-08 (strongly apply)
- TA- D403-08X3 ( 〃 3 Pack)
- TA- D403-08X10 ( 〃 Pack of 10)
- TA- D405-08N (heart pattern)
- TA- D400-20N (wide)
Other than the above part numbers and refill tape
For compatibility, please see the PDF below
How to use
-
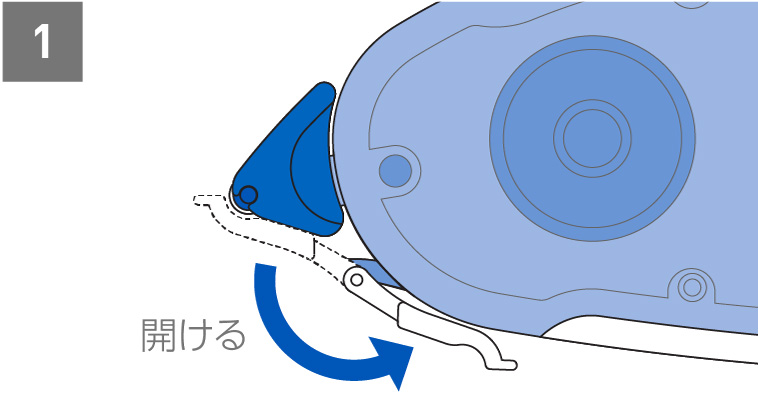
Open the cap and secure it to the bottom of the main unit. -
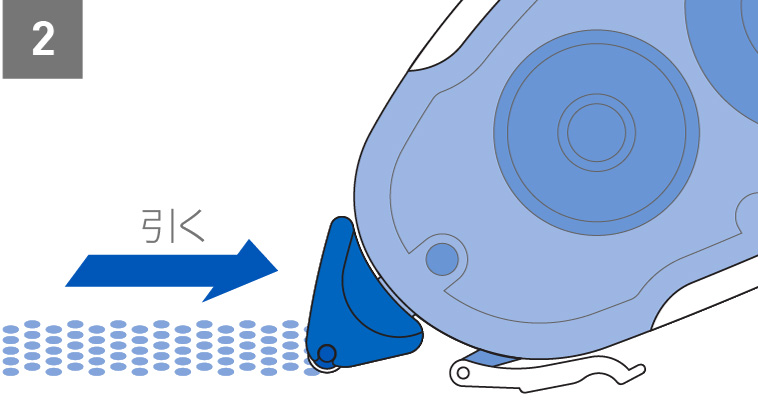
Glue will be transferred when you slowly pull it straight backwards.
How to refill
-
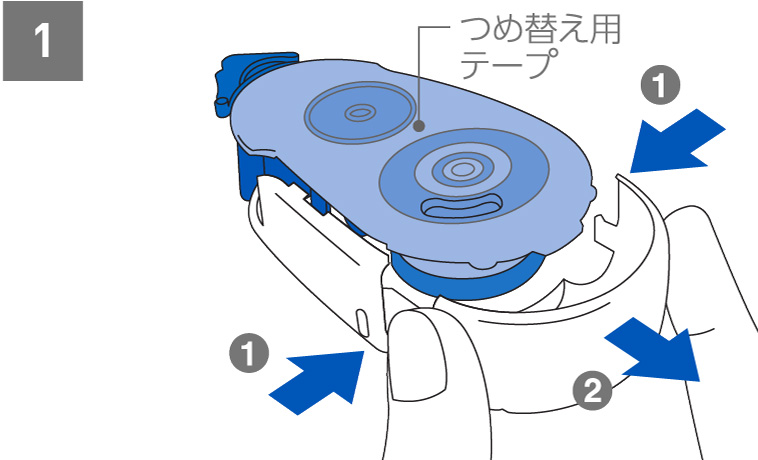
Pinch the main unit in direction ❶ and pull it in direction ❷ to lift the refill tape. -
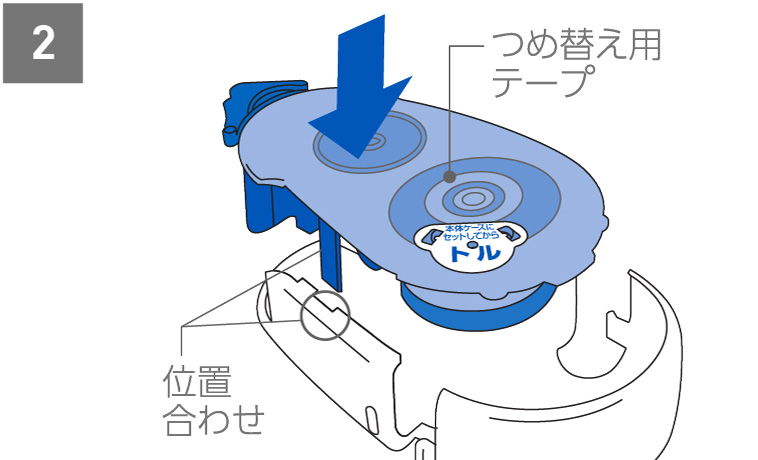
Replace the refill tape, align it and push it in. -
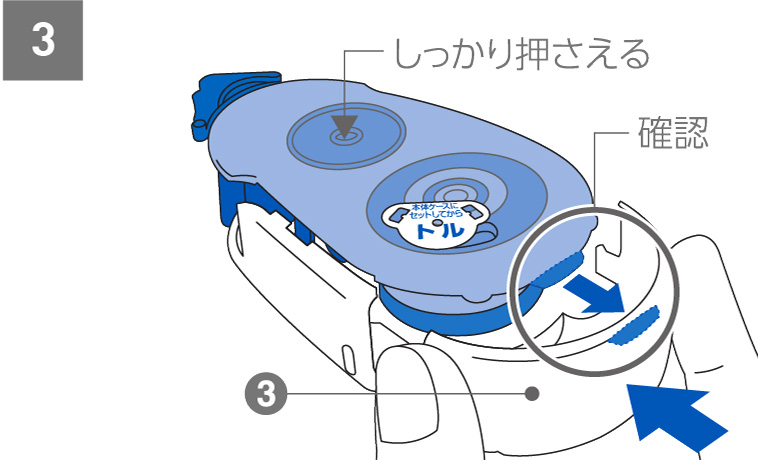
Hold the refill tape firmly and check that it locks with the main unit ❸. -
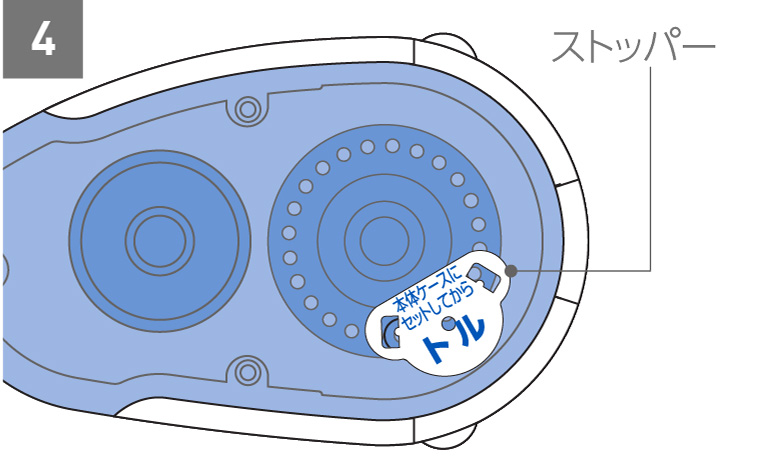
After refilling, please remove the stopper before use.
If the tape is slack
*Please be careful not to let the tape stick to each other or get tangled while working.
*If it sticks or gets tangled, please stop working and untie it before proceeding.
*Wear and tear on the main unit may cause the tape to sag, so please replace the main unit with a new one after approximately 10 refill tapes.
-
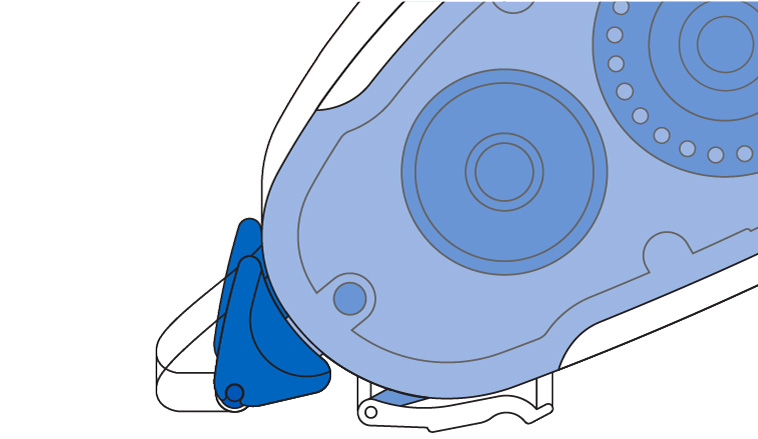
If the tape sags, stop gluing it for now.
[In case of small slack]
-
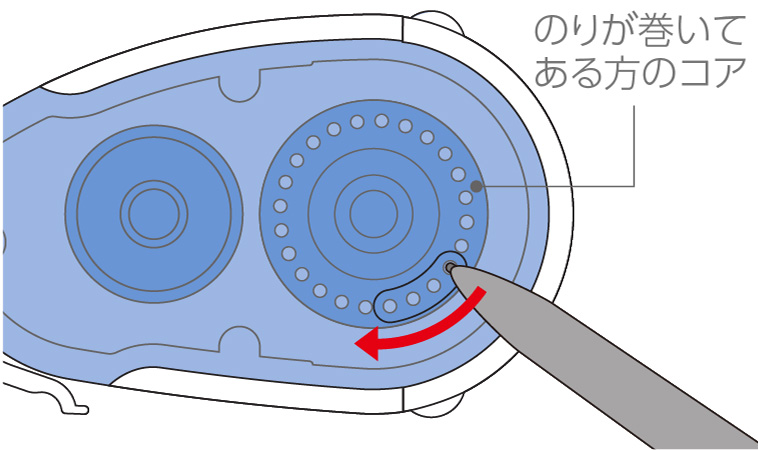
Place the tip of a pen or similar object into the groove and turn the core around which the glue is wrapped clockwise to take up any slack.
[In the case of significant sagging]
-
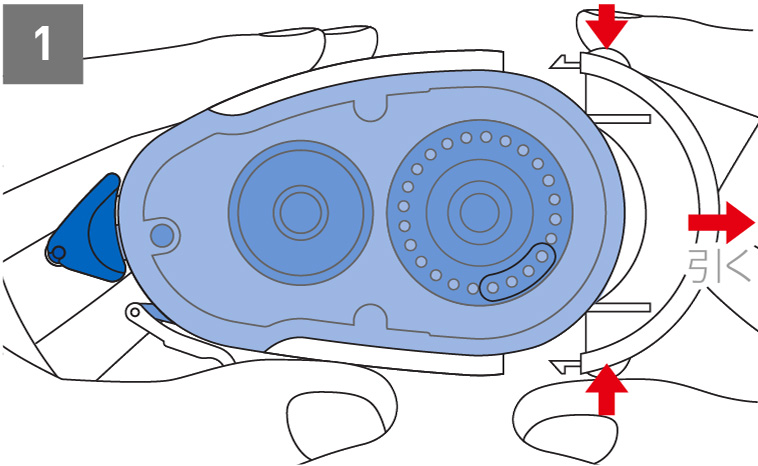
Leave the tape in place. Pinch the protrusions on both sides of the main unit and pull them backward. -
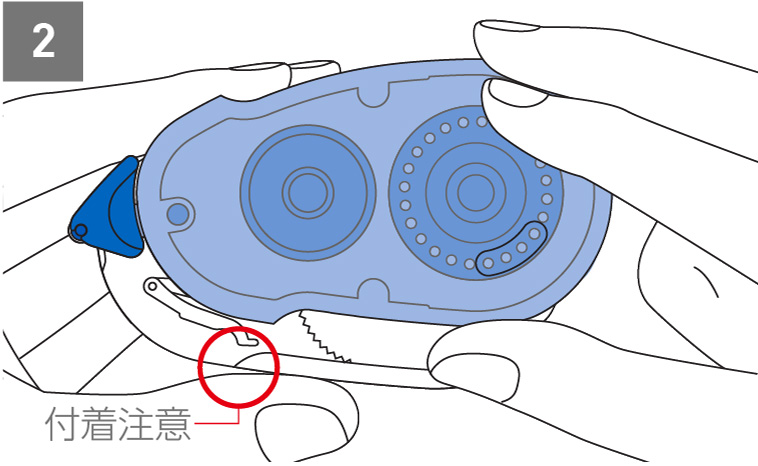
Be careful not to stick the tape to the main unit and remove the replacement tape straight. -
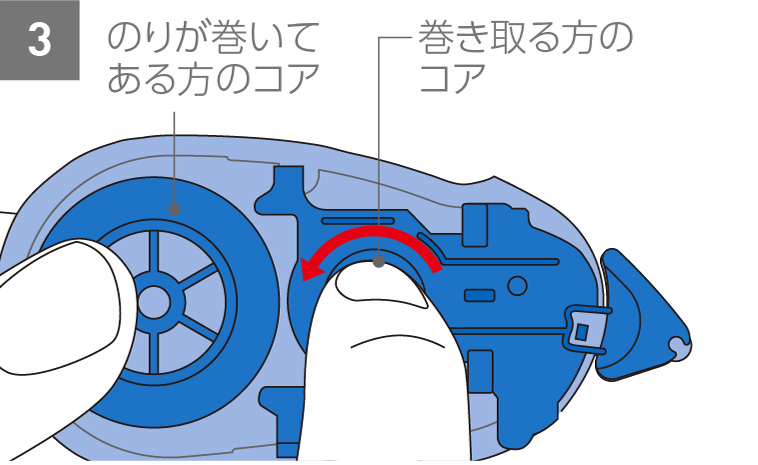
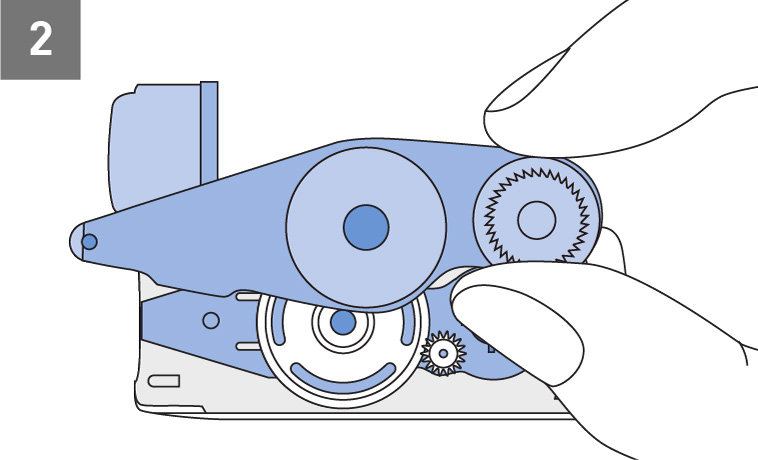
Turn the refill tape over sideways. While holding the core with the adhesive tape wound around it, slowly rotate the take-up core counterclockwise to remove any slack in the tape. -
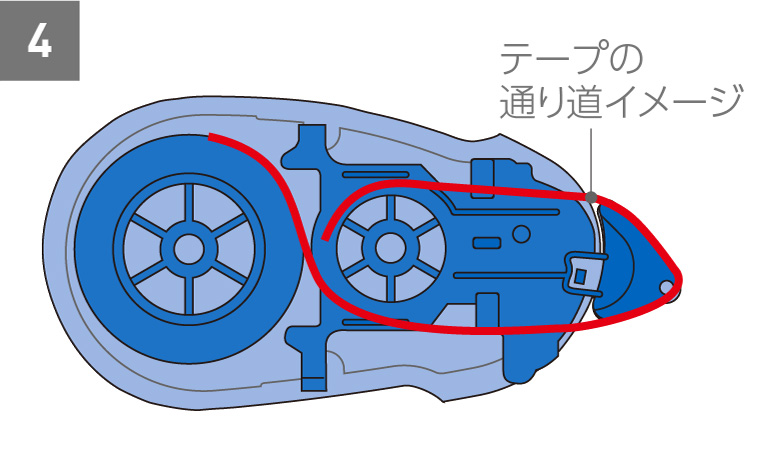
Make sure that the tape is taut and does not slack, then set the refill tape into the main unit.
DOT LINER Hold
Support Information
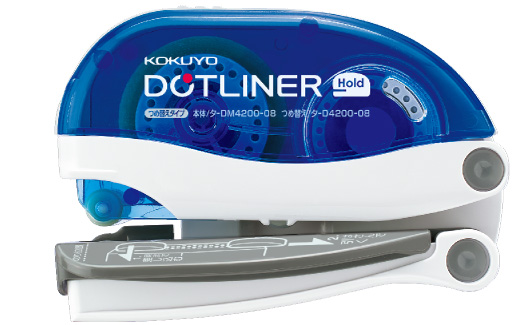
Storng Adhesive
TA- DM4200-08
List of refill tapes
- TA-D4200-08
- TA- D4200-08X10 (pack of 10)
Other than the above part numbers and refill tape
For compatibility, please see the PDF below
How to use (closing the envelope)
-
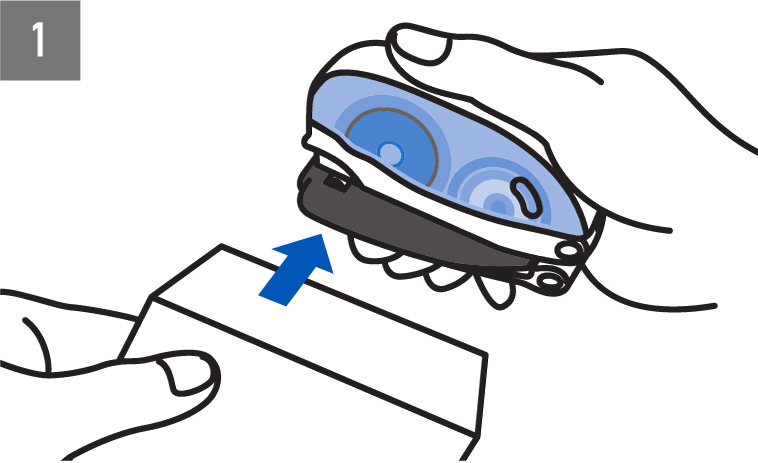
Insert the gluing part of the envelope all the way in so that it is parallel to the main body, and align the position where you want to start gluing with the ``glue from here'' arrow. -
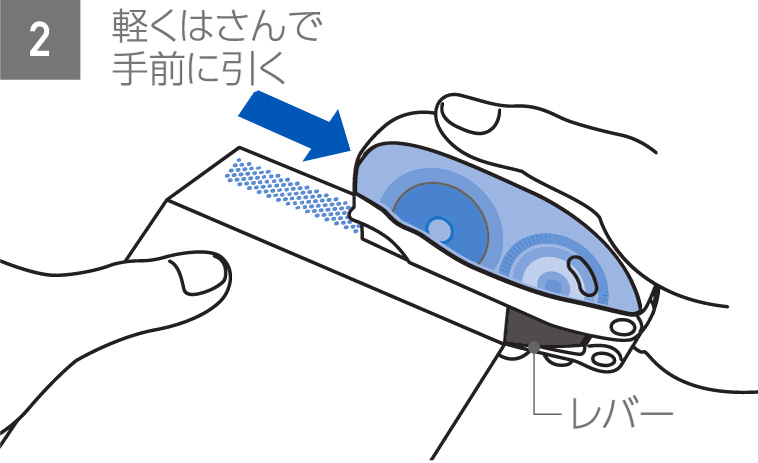
Lightly squeeze the lever to hold the envelope in place. While holding the leading edge of the envelope, slowly pull the unit toward you to apply the adhesive. When the adhesive has been applied to the desired position, release the lever and remove the envelope. *Do not grip too tightly, as it may damage the paper.
How to use (glue on a small piece of paper)
-
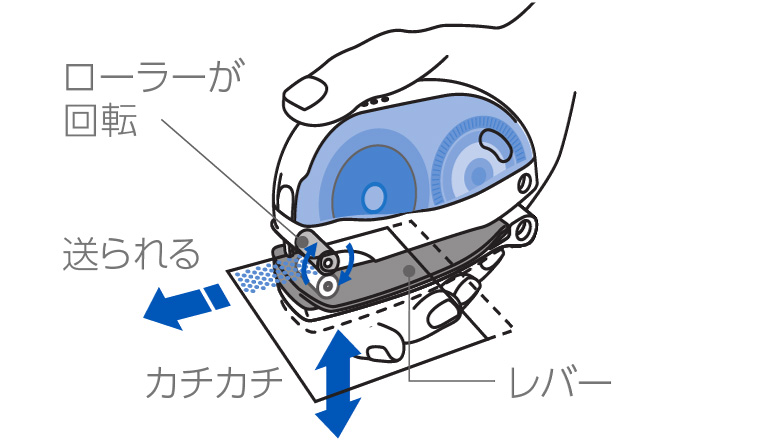
Insert the paper all the way into the unit. Repeatedly squeeze and release the lever. As the roller rotates, the adhesive is automatically transferred onto the paper.
*Be careful not to allow the paper to be caught in the roller.
How to use (glue on a large surface)
-
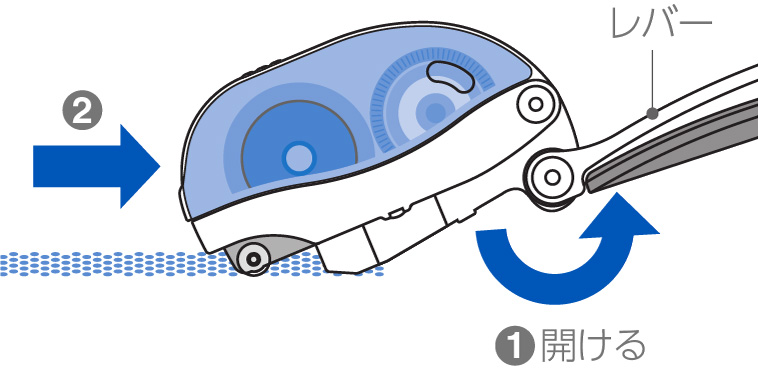
Insert the paper all the way into the unit. Repeatedly squeeze and release the lever. As the roller rotates, the adhesive is automatically transferred onto the paper.
*Be careful not to allow the paper to be caught in the roller.
How to refill
-
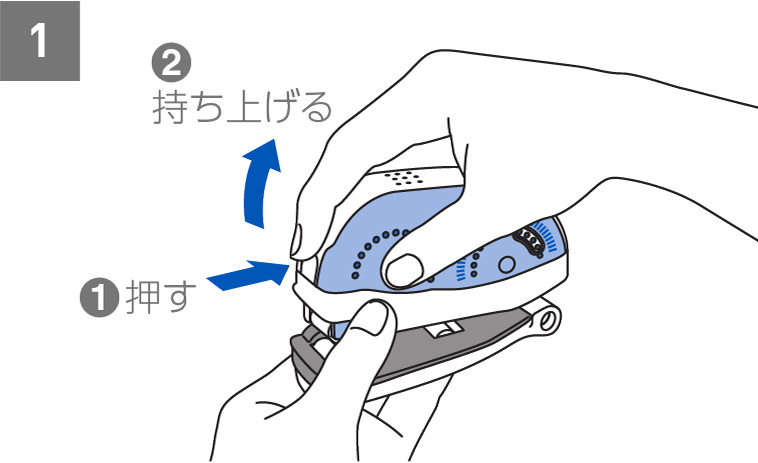
❶Press the ``PUSH button'' and lift it in the direction of ❷. -
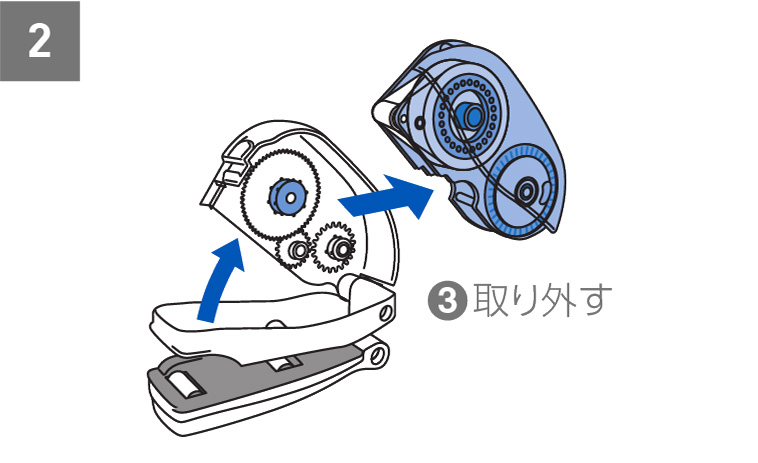
❸Remove the refill tape. -
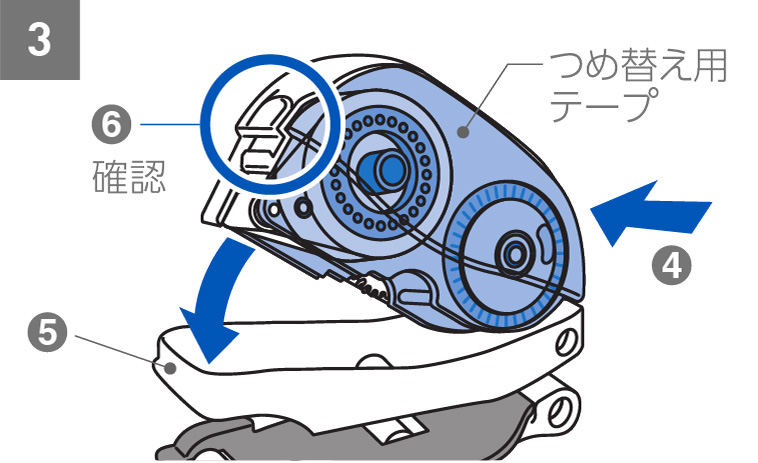
❹ Replace the refill tape, align it and keep pushing it in. ❺ Insert it securely into the main unit. ❻ Check the lock.
If the tape does not come out properly
*Please be careful not to let the tape stick to each other or get tangled while working.
*If it sticks or gets tangled, please stop working and untie it before proceeding.
*Wear and tear on the main unit may cause the tape to sag, so please replace the main unit with a new one after approximately 10 refill tapes.
-
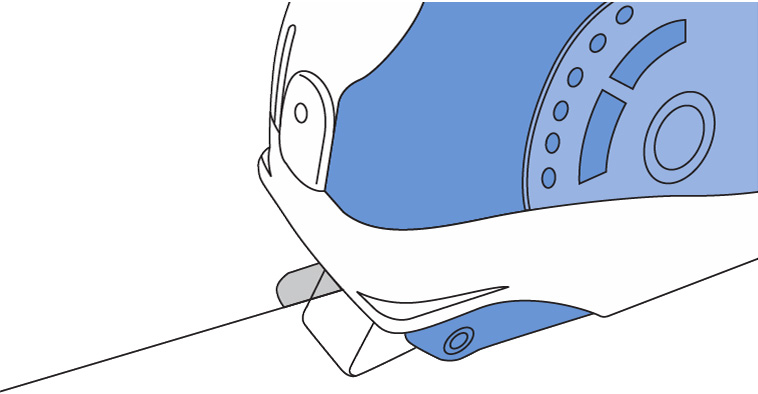
If the tape does not come out well, stop gluing for a moment.
-
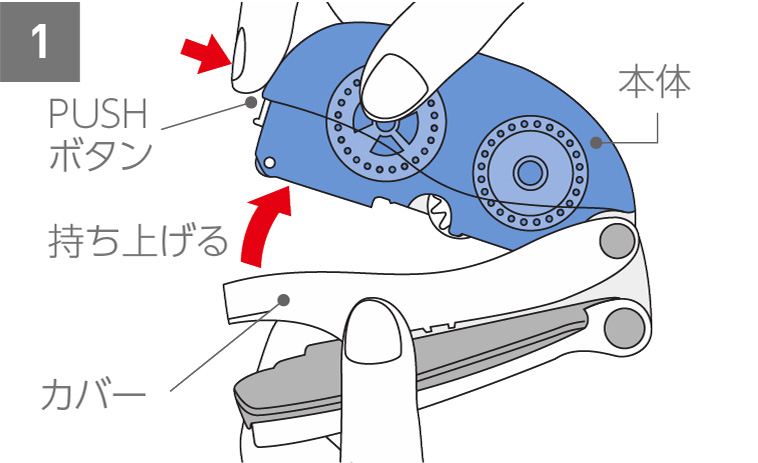
Leave the tape as is and lift the main unit while pressing the "PUSH button" on the side of the main unit. -
Remove the refill tape straight away. -
Turn the refill tape over sideways. While holding the core with the adhesive tape wound around it, slowly rotate the take-up core counterclockwise to remove any slack in the tape. -
Make sure that the tape is taut and does not slack, then set the refill tape into the main unit.
DOT LINER Long 50
Support Information
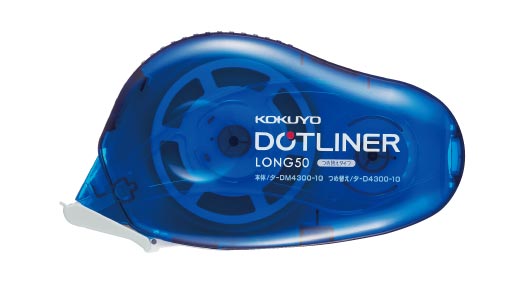
Storng Adhesive
TA- DM4300-10
List of refill tapes
- TA- D4300-10 (Storng Adhesive)
- TA- D4300-10X5 (〃 5 pack)
Other than the above part numbers and refill tape
For compatibility, please see the PDF below
How to use
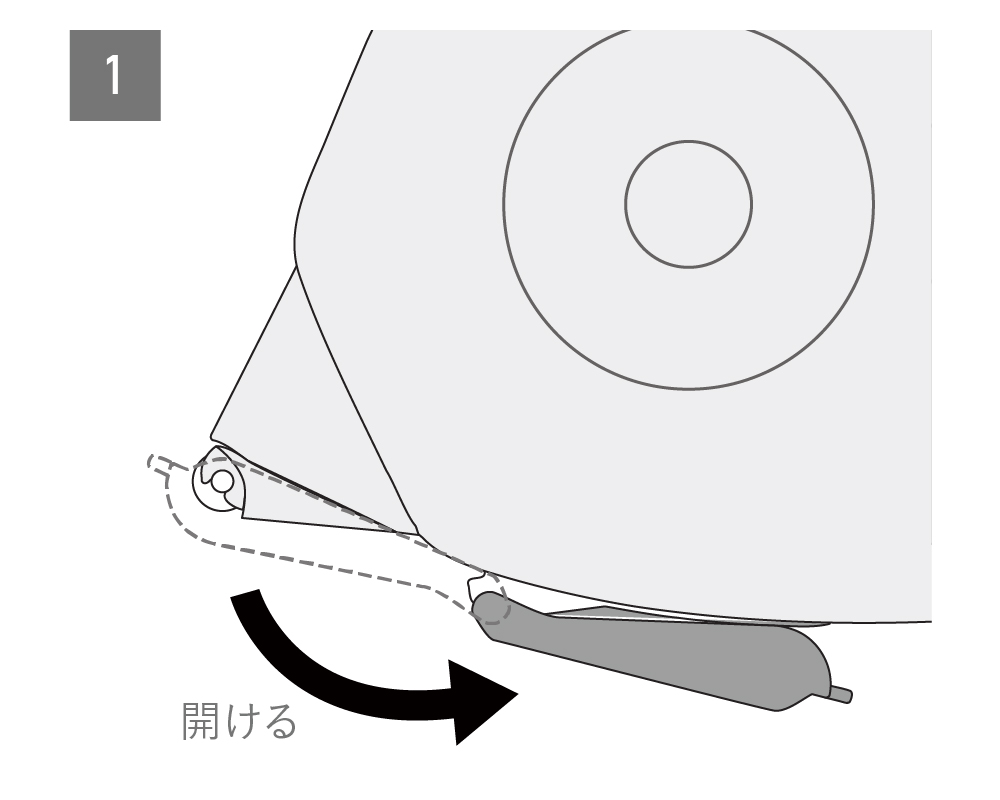
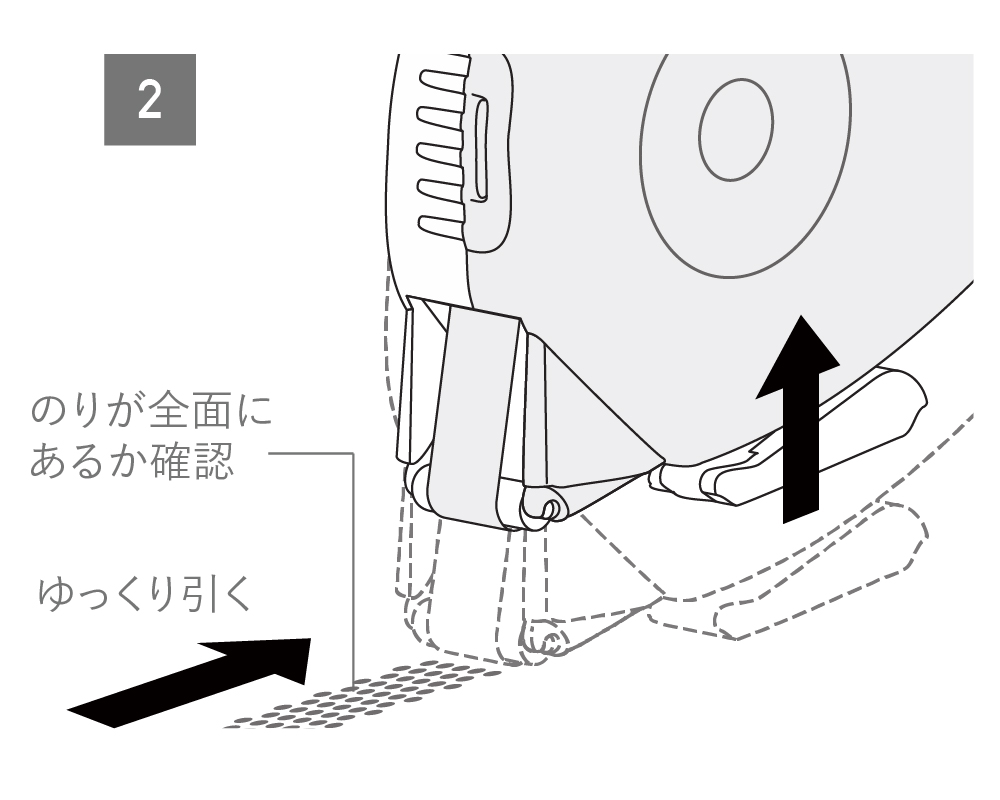
※注意:のりが転写されずに巻き取られると正常に動作しなくなります。
How to refill
-
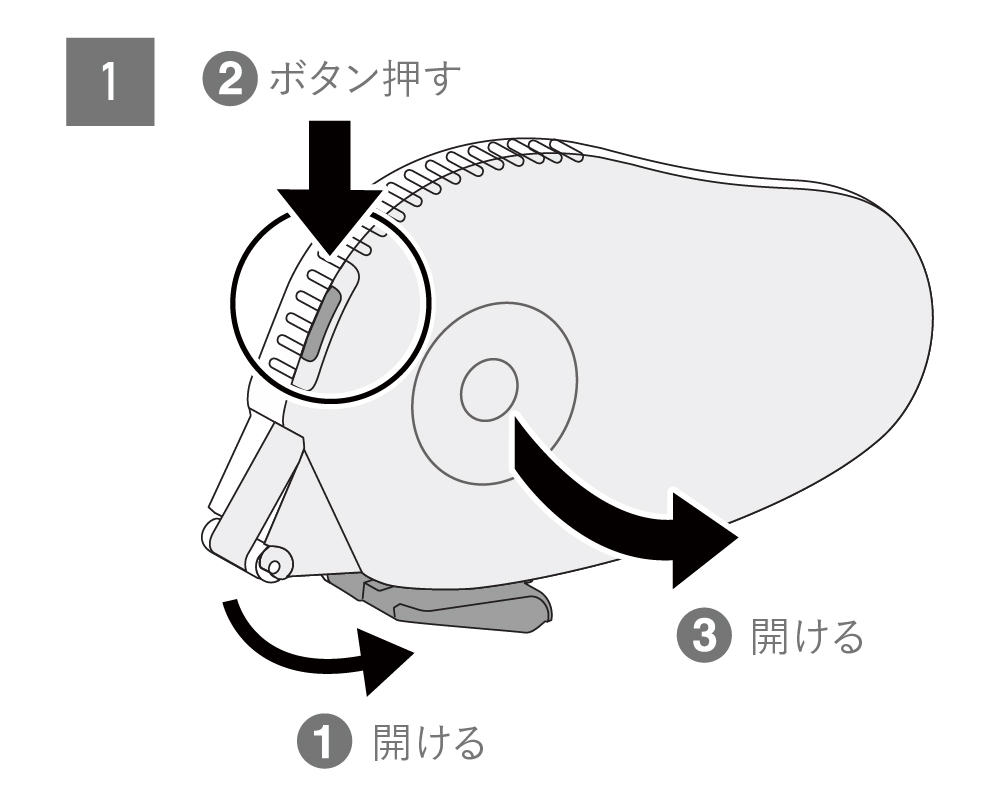
❶ Open the cap, ❷ while pressing the button on the top, ❸ open the cover.
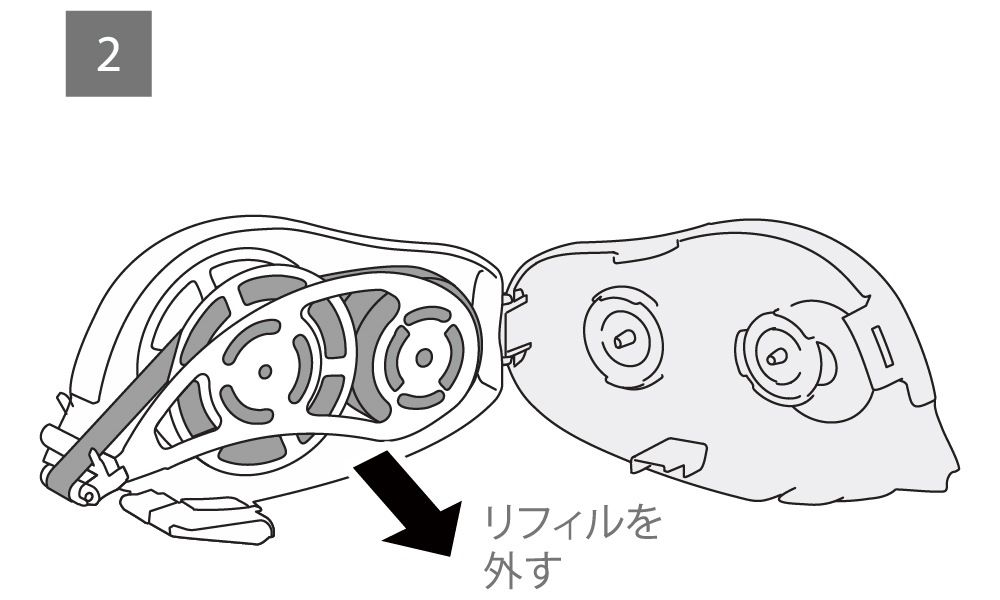
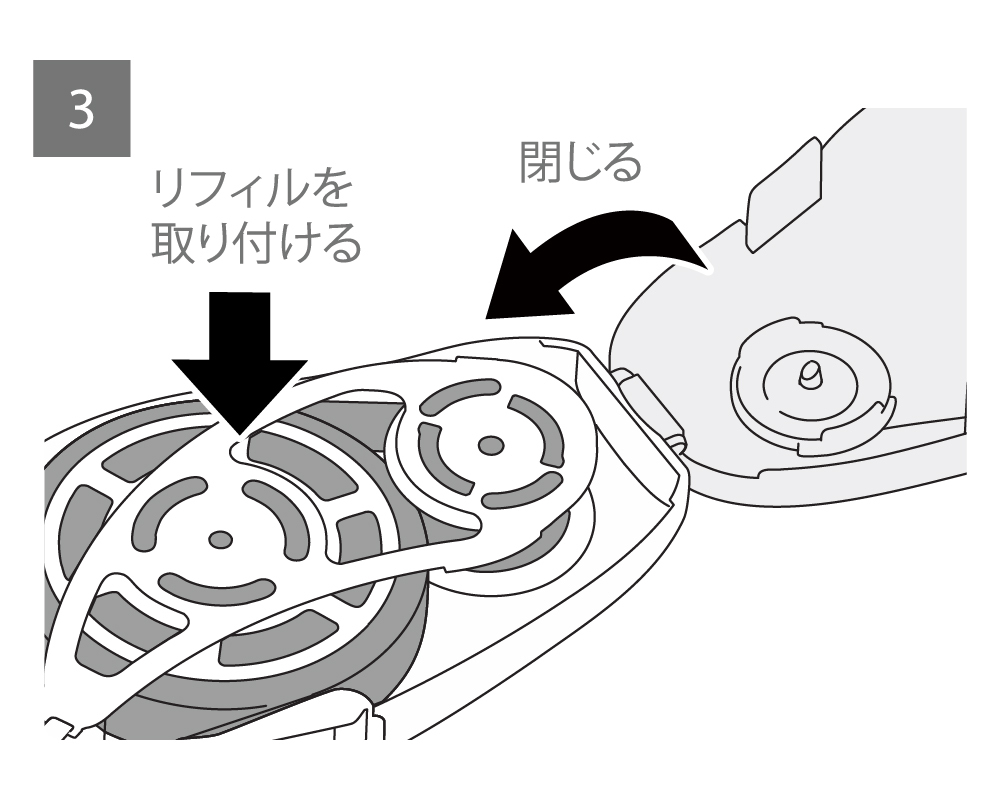
If the tape does not come out properly
-
【のりが転写されずに巻かれている状態】
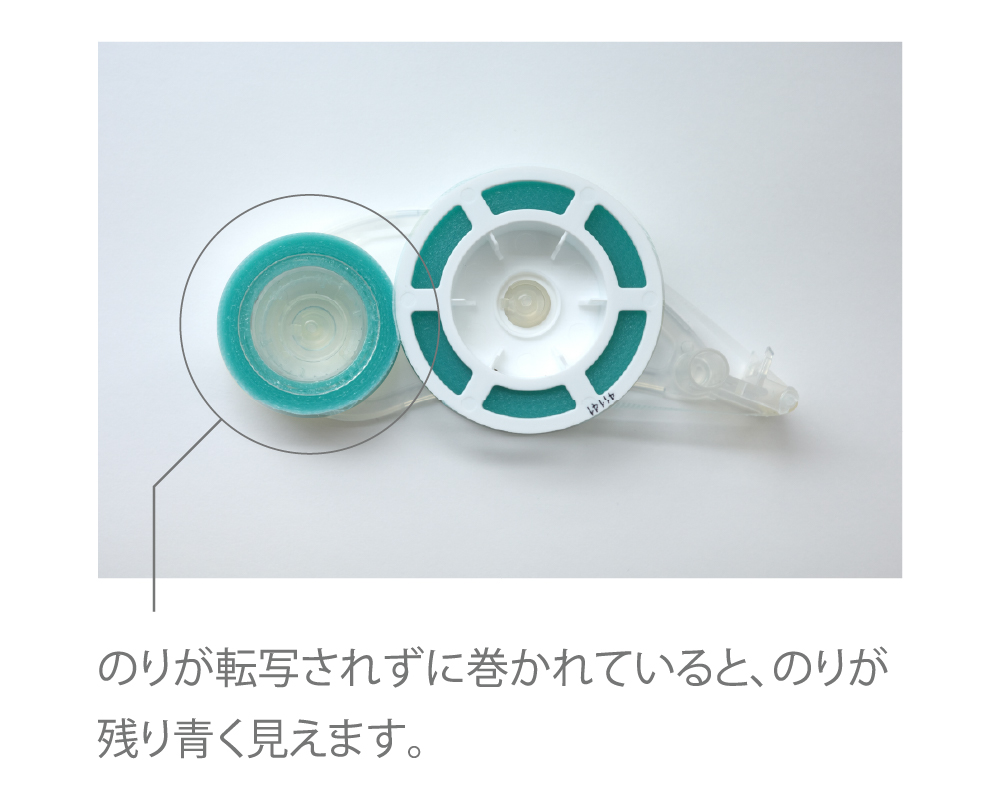
のりが残っていますとロールが動かなくなりますので新しいテープと交換してください。 -
【キレイに転写されて巻かれている状態】
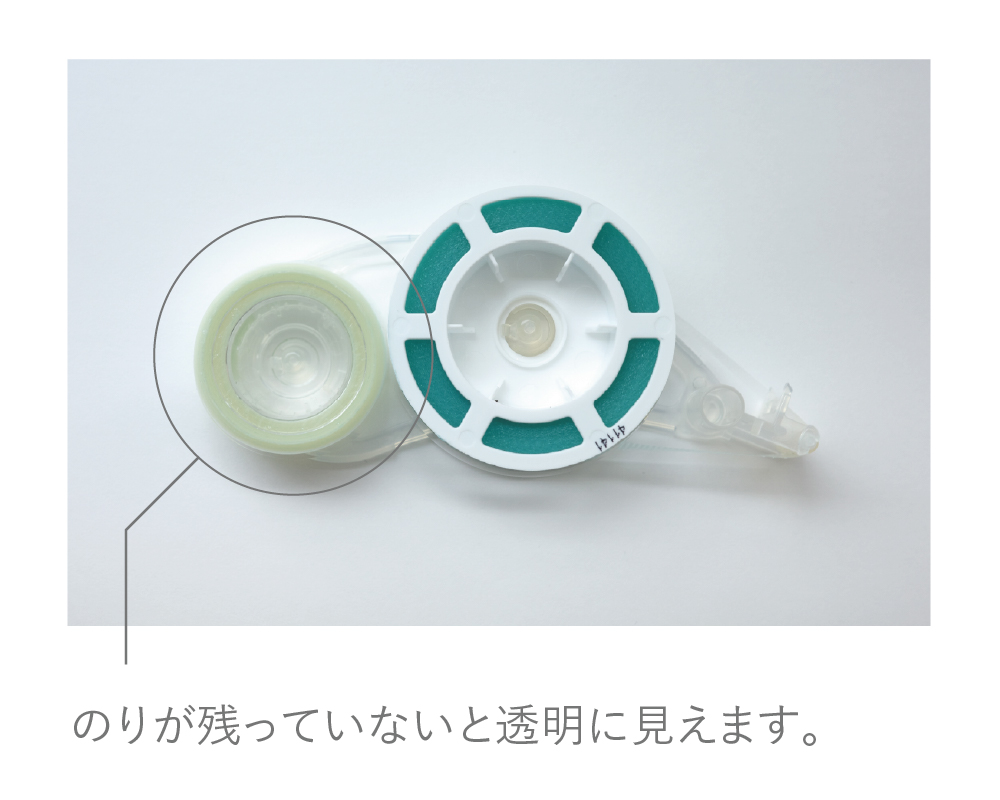
[In the case of significant sagging]
-
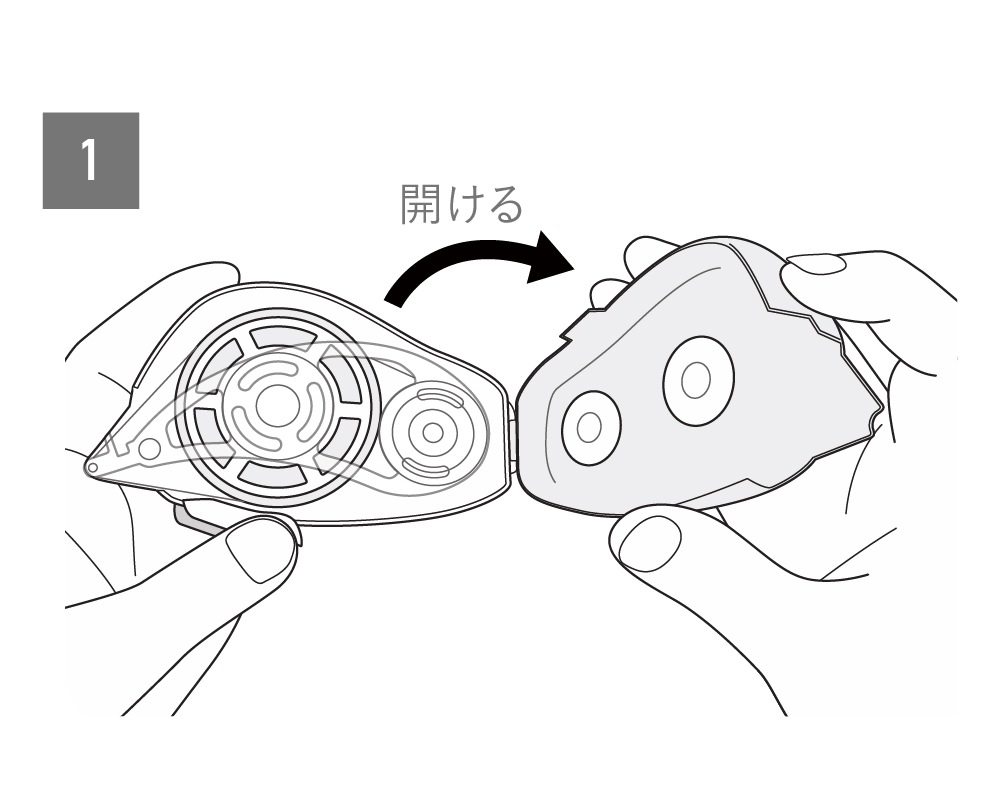
カバーを開けます。 -
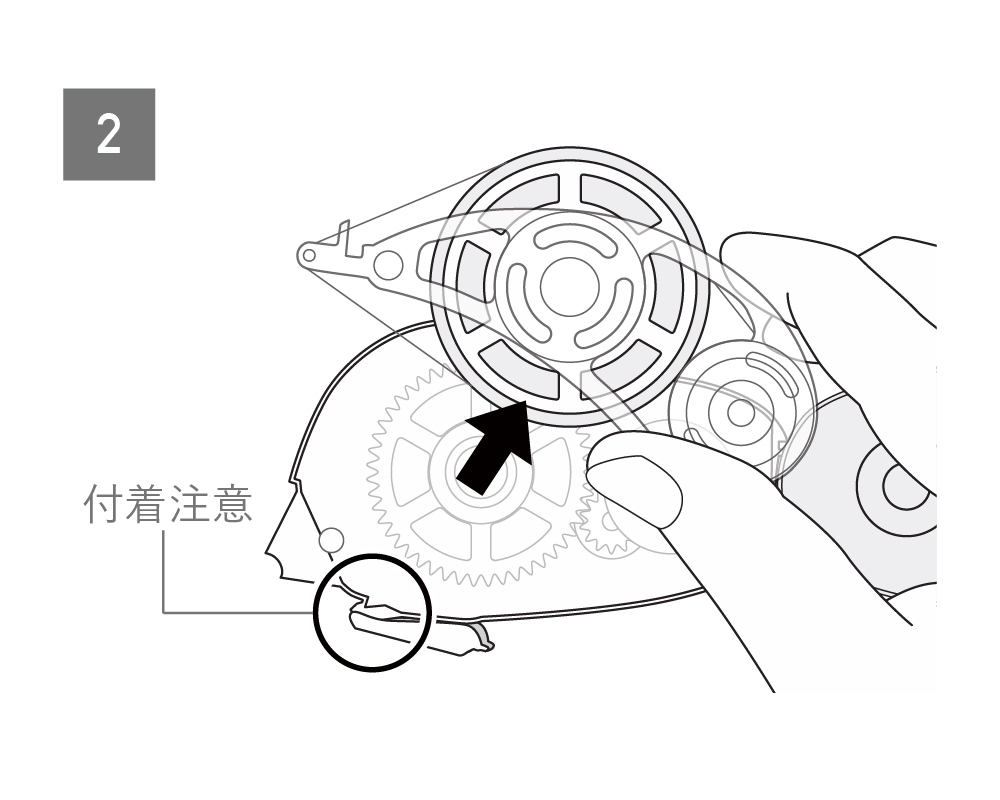
本体にのりを付けないようにリフィルを外します。 -
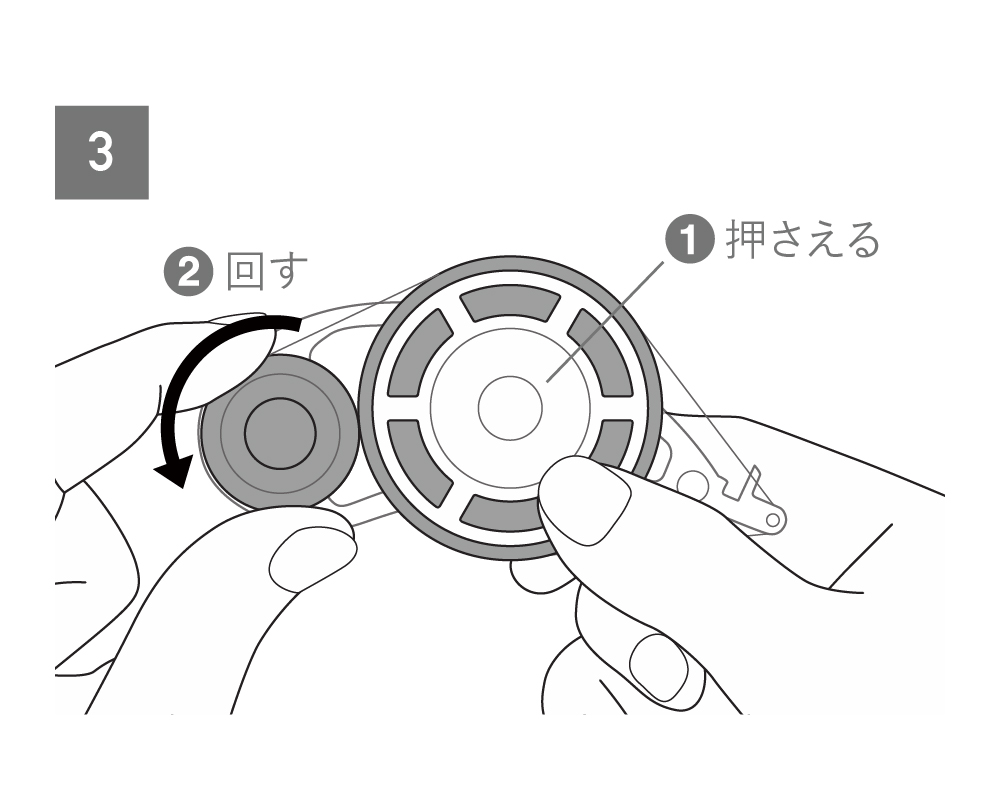
1、2の手順でテープを張ってたるみを直してください。
※注意:❶を押さえずに❷を回すとテープを巻き込み動かなくなります -
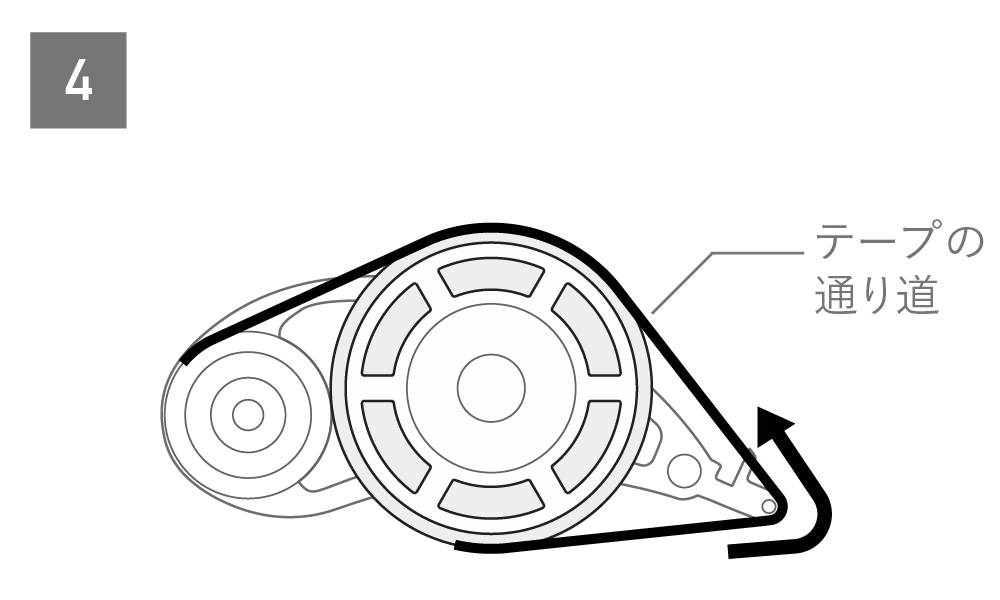
テープがたるまず張っていることを確認しテープをセットしてください。
DOT LINER Long
Support Information
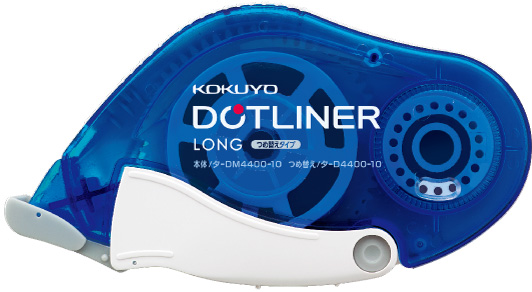
Storng Adhesive
TA- DM4400-10
List of refill tapes
- TA- D4400-10 (Storng Adhesive)
- TA- D4400-10X5 (〃 5 pack)
Other than the above part numbers and refill tape
For compatibility, please see the PDF below
How to use
-
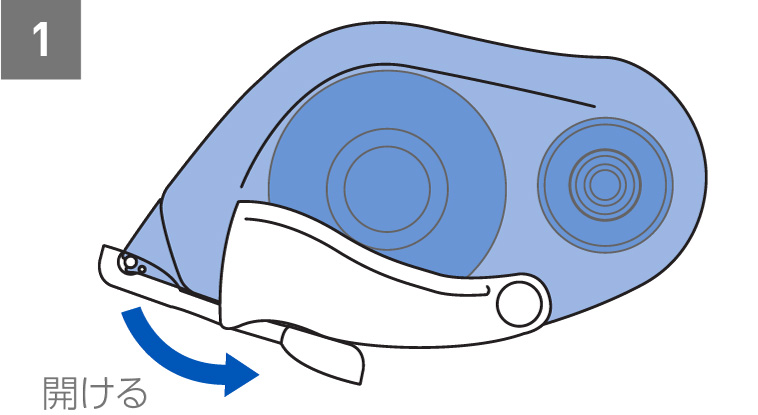
Open the cap and secure it to the bottom of the main unit. -
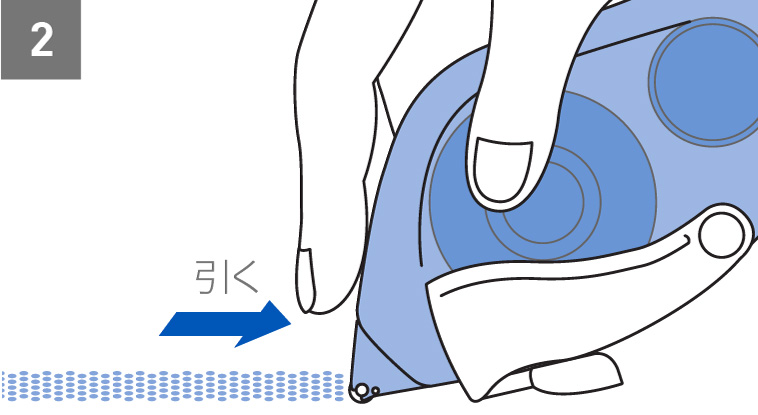
Place the tip on the area you want to paste and slowly pull it straight backwards to transfer the tape glue.
How to refill
-
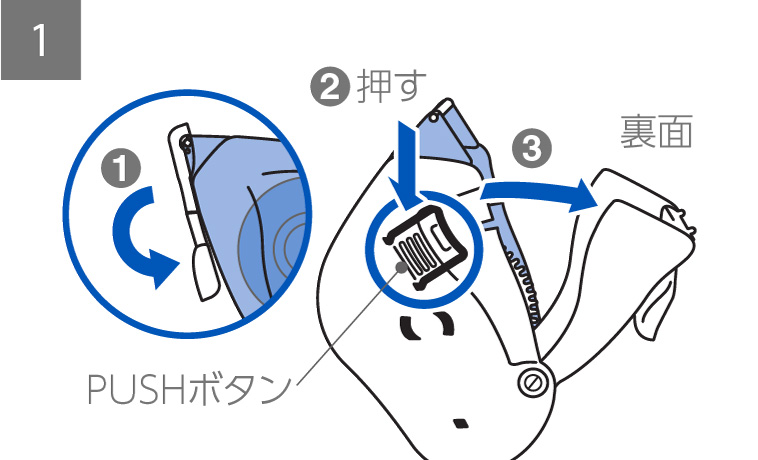
Fix the ❶ cap at the tip to the bottom of the main unit, press the ``PUSH button'' on the back of the ❷ main unit to release the lock, and remove the lock cover in the direction of ❸. -
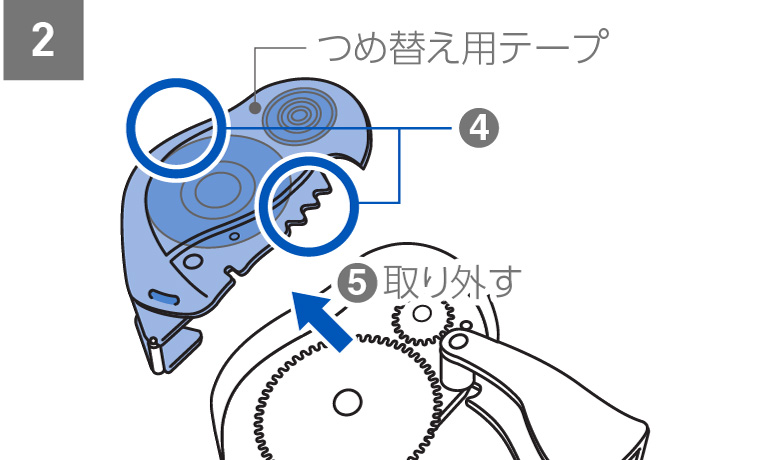
Lift the top and bottom parts ❹ of the refill tape, and remove it from the main unit ❺ . -
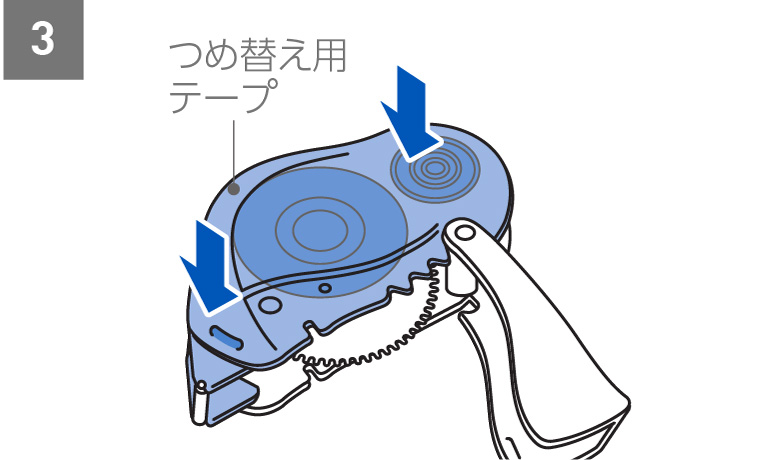
Replace the refill tape, align it and push it in. -
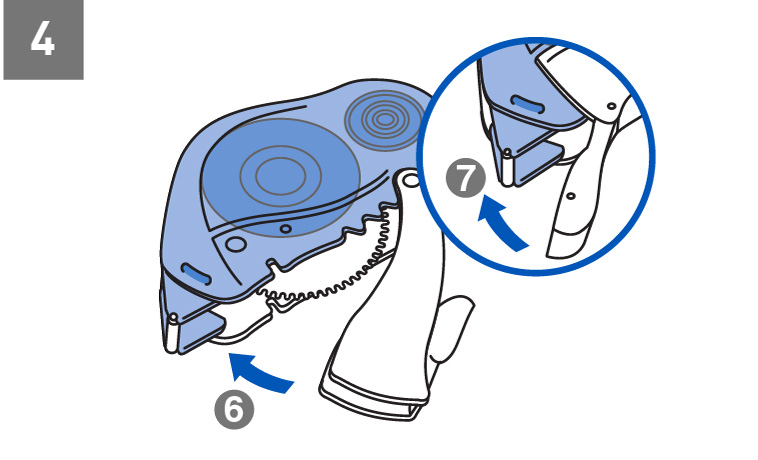
After refilling, put back the lock cover ❻ and then put back the cap ❼ at the tip.
If the tape does not come out properly
*Please be careful not to let the tape stick to each other or get tangled while working.
*If it sticks or gets tangled, please stop working and untie it before proceeding.
*Wear and tear on the main unit may cause the tape to sag, so please replace the main unit with a new one after approximately 10 refill tapes.
-
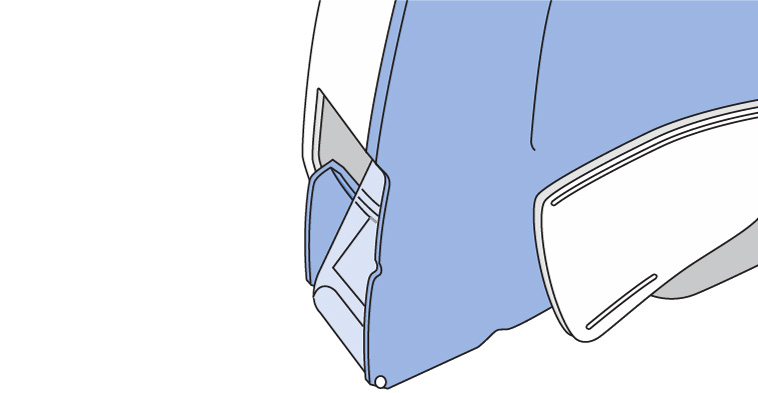
If the tape does not come out well, stop gluing for a moment.
-
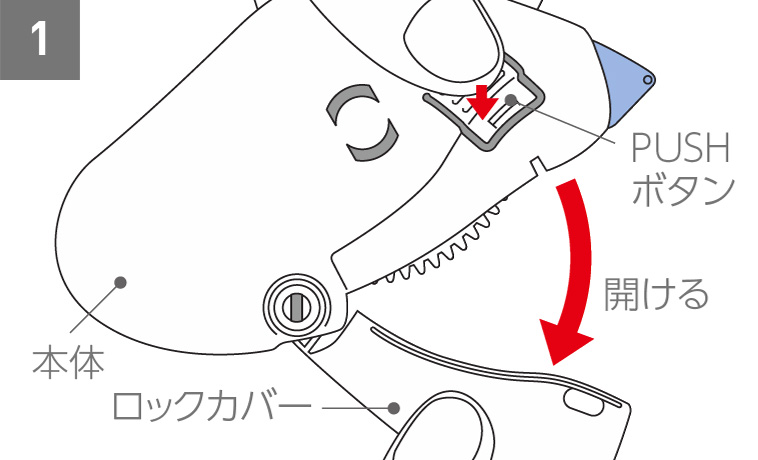
Leave the tape as is and open the lock cover while pressing the "PUSH button" on the back of the main unit. -
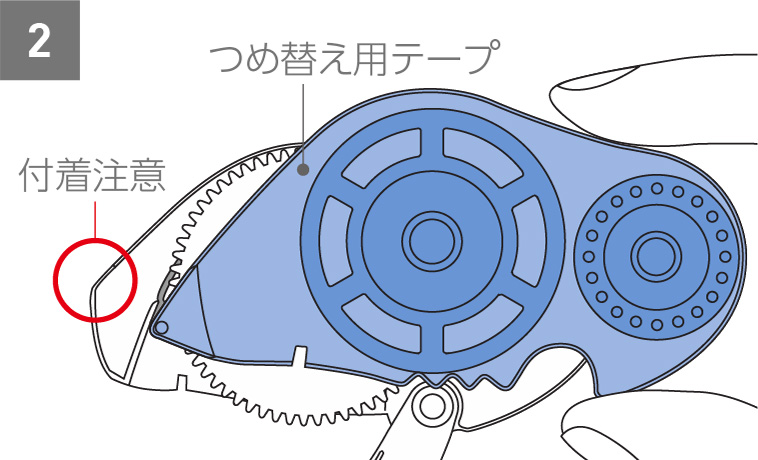
Be careful not to stick the tape to the main unit and remove the replacement tape straight. -
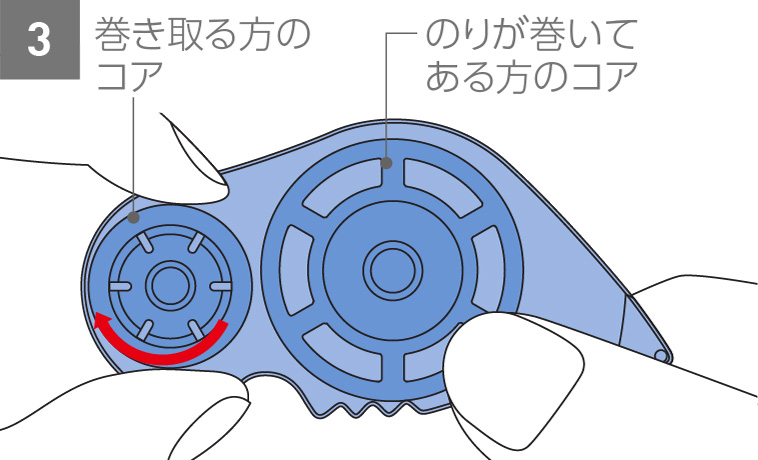
Turn the refill tape over sideways. While holding the core with the adhesive tape wound around it, slowly rotate the take-up core clockwise to remove any slack in the tape. -
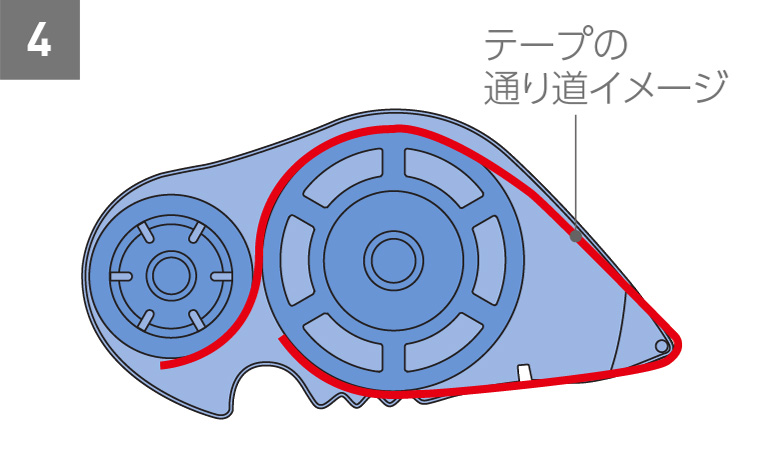
Make sure that the tape is taut and does not slack, then set the refill tape into the main unit.
DOT LINER Power
Support Information
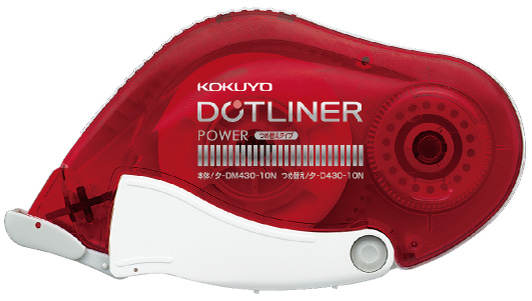
Attach super strongly
TA- DM430-10N
List of refill tapes
- TA- D430-10N (power)
Other than the above part numbers and refill tape
For compatibility, please see the PDF below
How to use
-
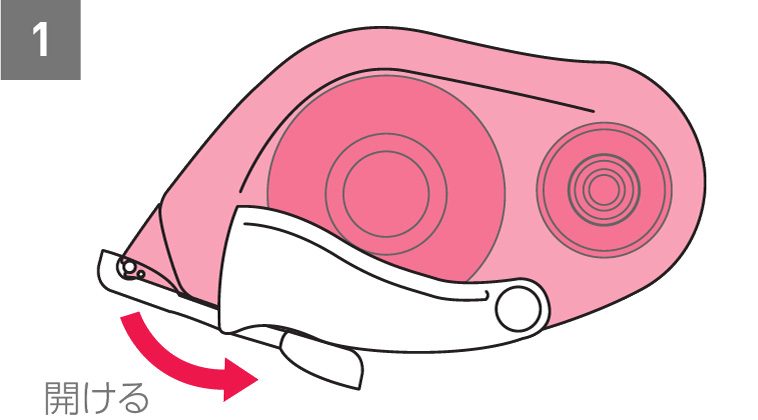
Open the cap and secure it to the bottom of the main unit. -
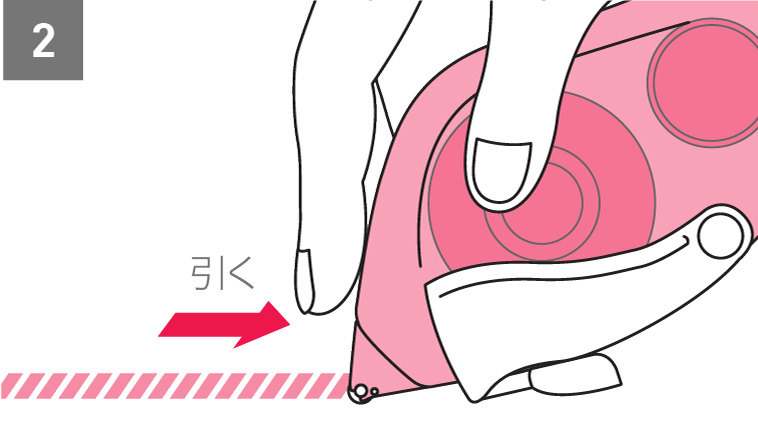
Place the tip on the area you want to paste and slowly pull it straight backwards to transfer the tape glue. -
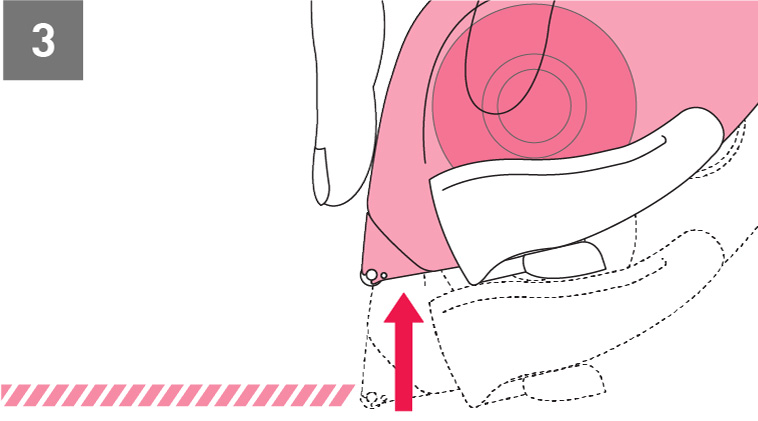
At the position where you want to cut, slowly lift the body straight up with the tip as shown by the arrow in the figure.
How to refill
-
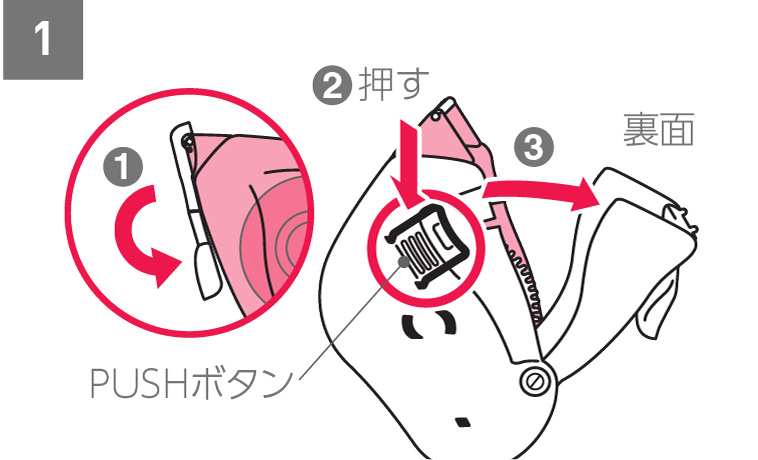
Fix the ❶ cap at the tip to the bottom of the main unit, press the ``PUSH button'' on the back of the ❷ main unit to release the lock, and remove the lock cover in the direction of ❸. -
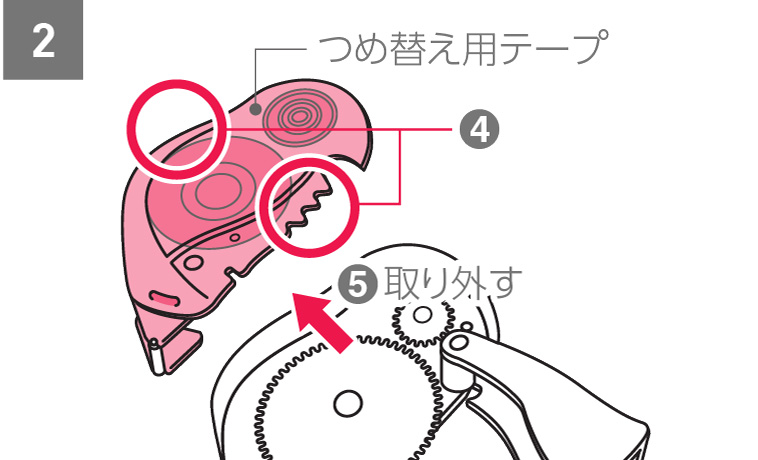
Lift the top and bottom parts ❹ of the refill tape, and remove it from the main unit ❺ . -
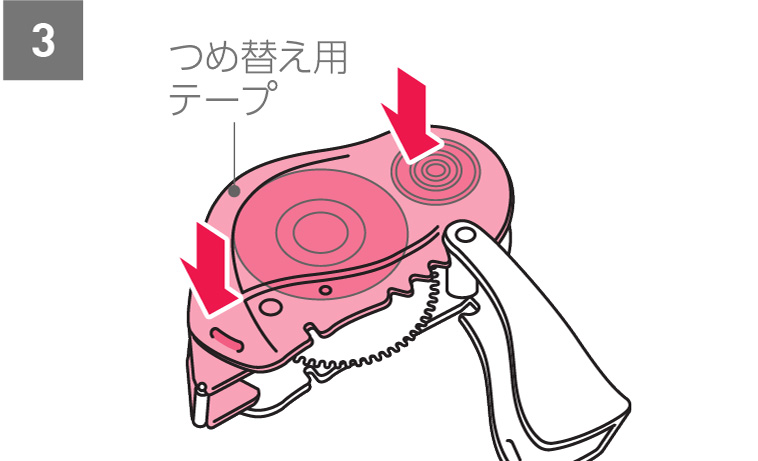
Replace the refill tape, align it and push it in. -
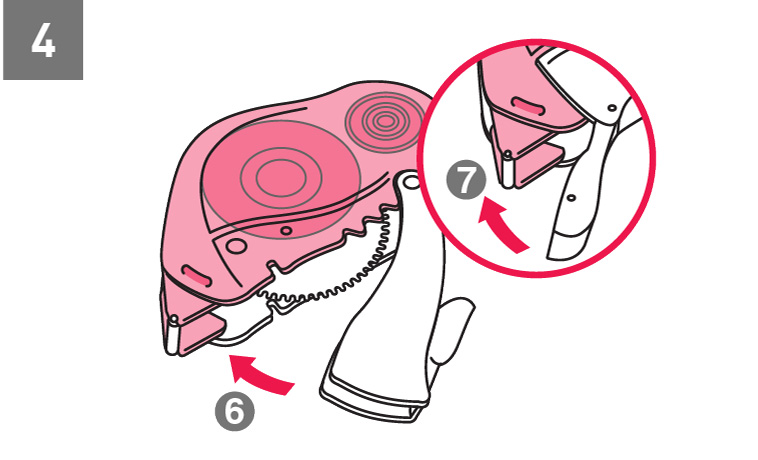
After refilling, put back the lock cover ❻ and then put back the cap ❼ at the tip.
If the tape does not come out properly
*Please be careful not to let the tape stick to each other or get tangled while working.
*If it sticks or gets tangled, please stop working and untie it before proceeding.
*Wear and tear on the main unit may cause the tape to sag, so please replace the main unit with a new one after approximately 10 refill tapes.
-
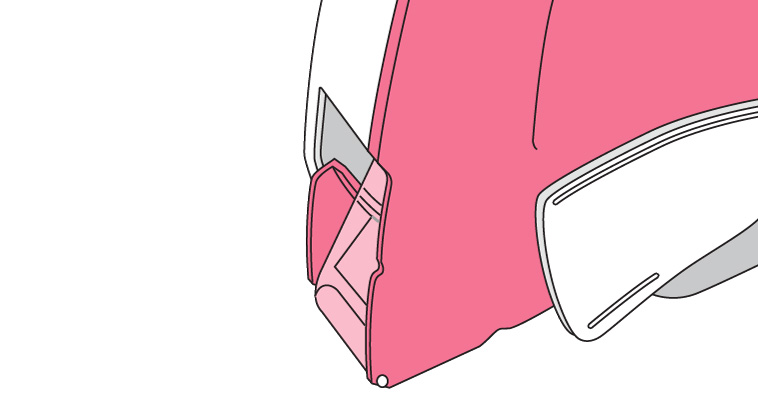
If the tape does not come out well, stop gluing for a moment.
-
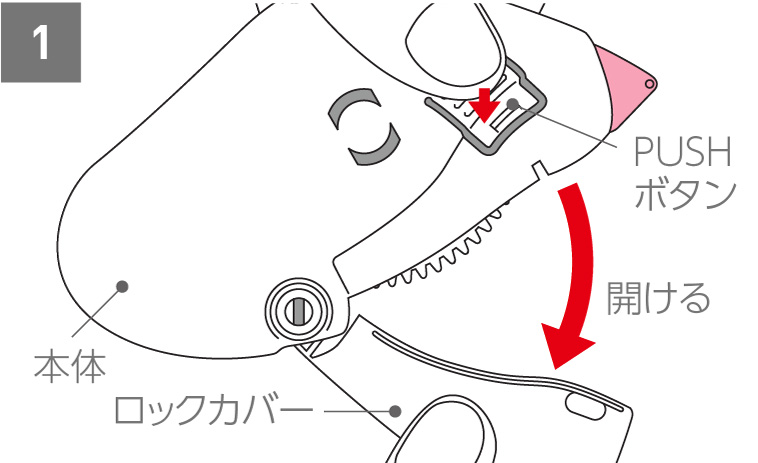
Leave the tape as is and open the lock cover while pressing the ``PUSH button'' on the back of the unit. -
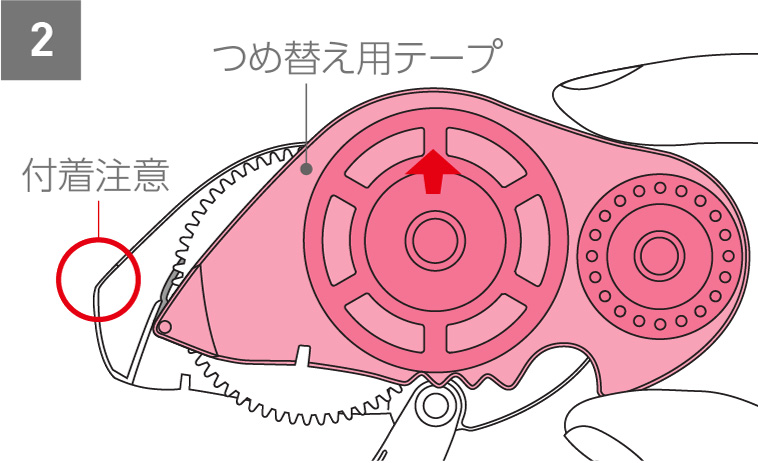
Be careful not to stick the tape to the main unit and remove the replacement tape straight. -
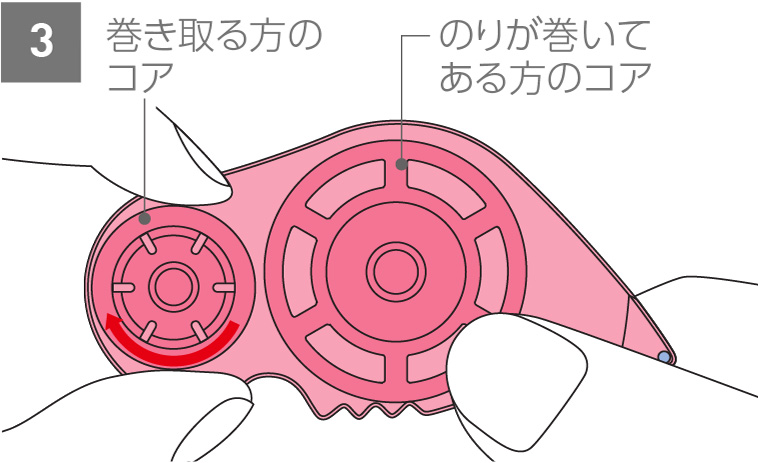
Turn the refill tape over sideways. While holding the core with the adhesive tape wound around it, slowly rotate the take-up core clockwise to remove any slack in the tape. -
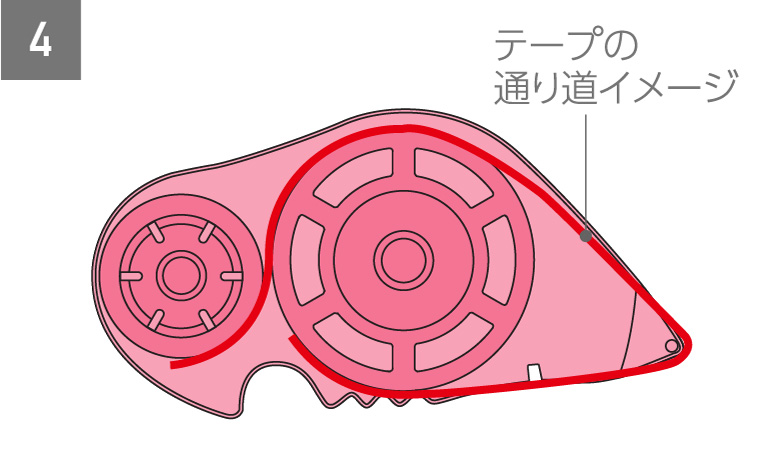
Make sure that the tape is taut and does not slack, then set the refill tape into the main unit.
DOT LINER Flick
Support Information
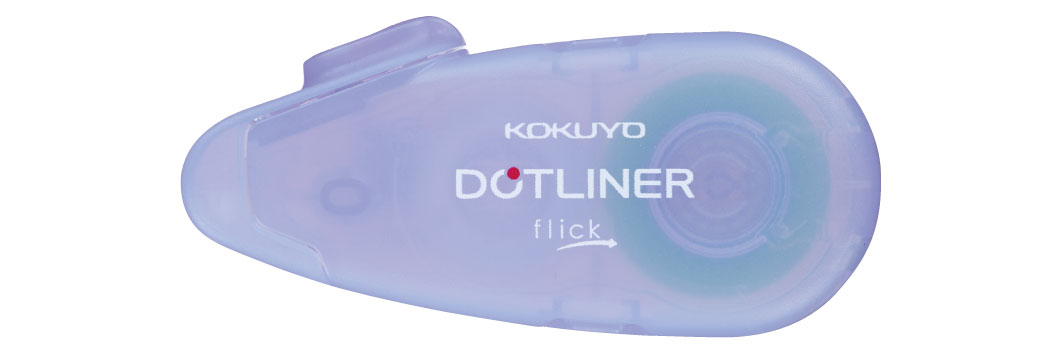
Storng Adhesive
TA- DM4900-06V/LB/W/B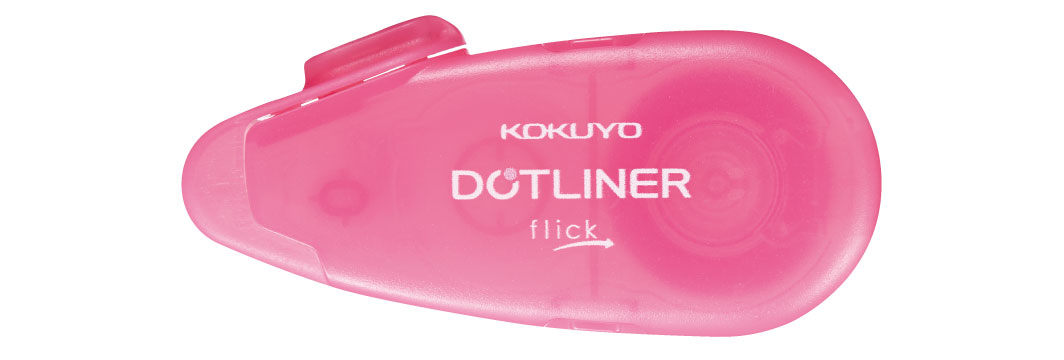
Storng Adhesive (Heart Pattern)
TA- DM4970-06-1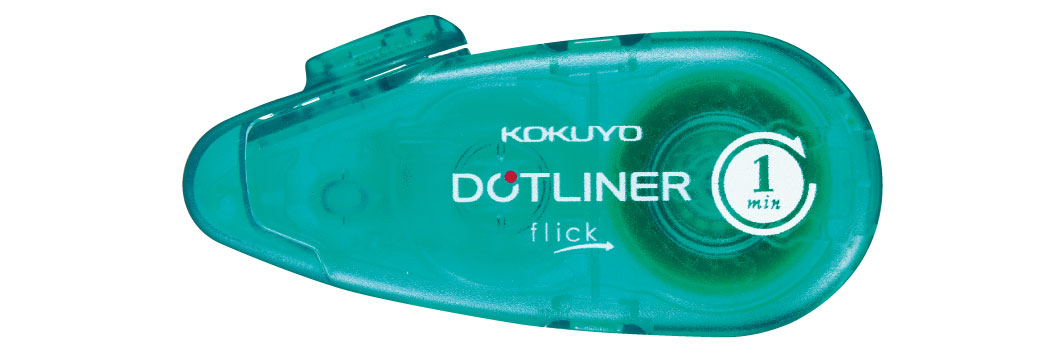
For printing and sticking later
TA- DM4920-06
List of refill tapes
- TA- D4900-06 (Storng Adhesive)
- TA- D4900-06X3 ( 〃 3 Pack)
- TA- D4970-06-1 (heart pattern)
- TA- D4920-06 (for printing/sticking later)
Other than the above part numbers and refill tape
For compatibility, please see the PDF below
How to use
-
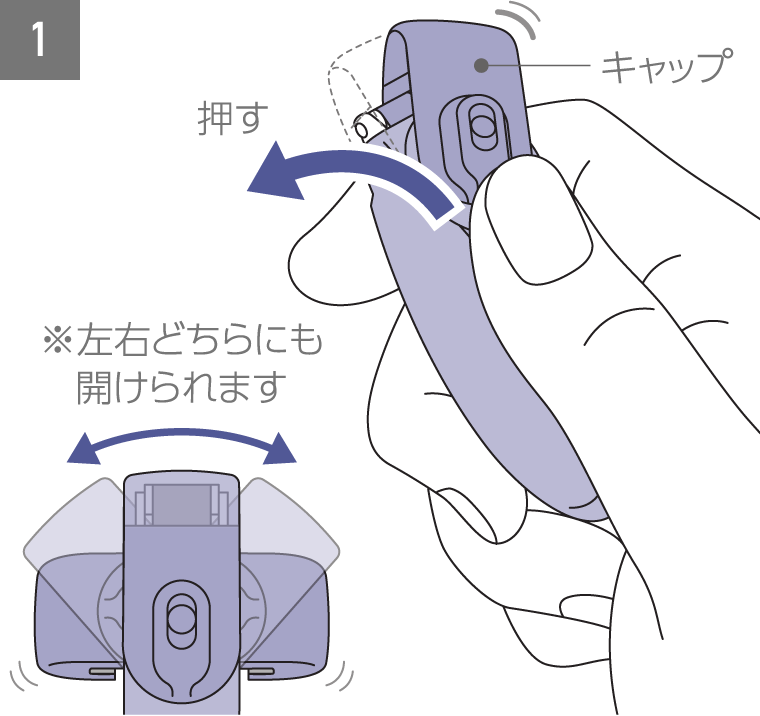
Press the back of the cap to turn it and rotate the cap 90 degrees to open it. The cap can be rotated to open either to the left or right.
-
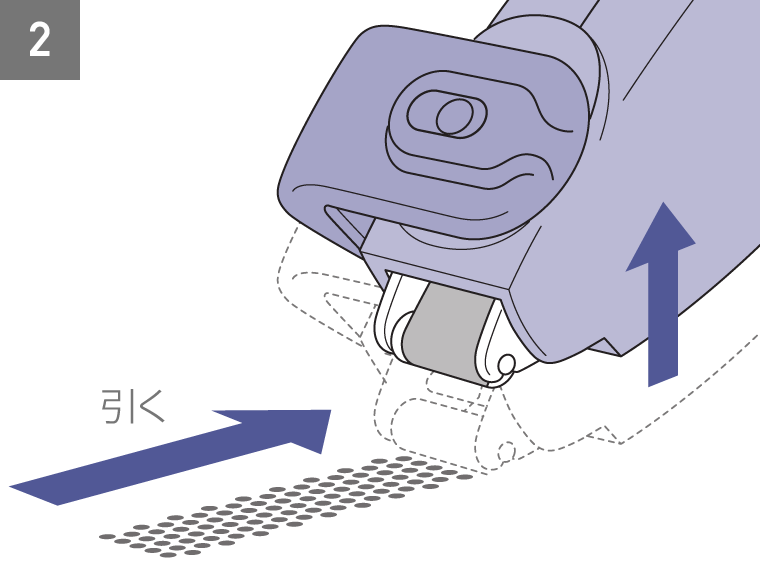
Glue will be transferred when you slowly pull it straight backwards. At the end of the pull, lift it straight up. -
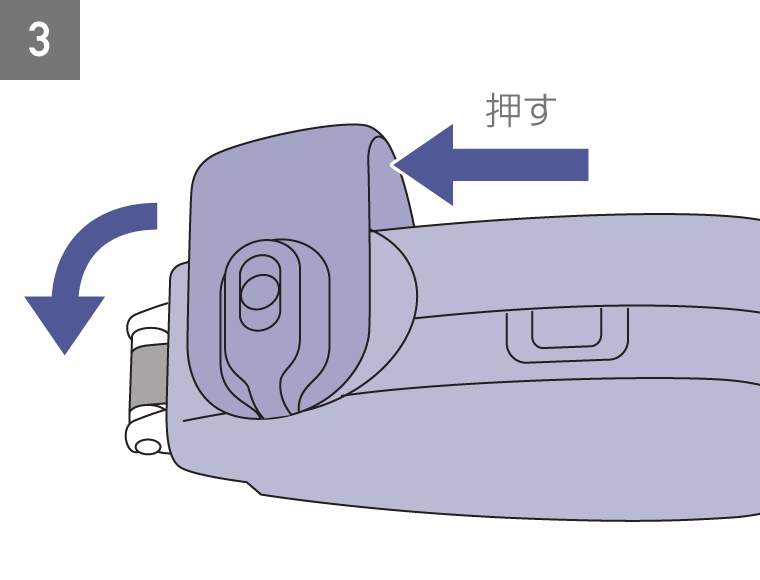
Rotate the cap to close it.
How to refill
-
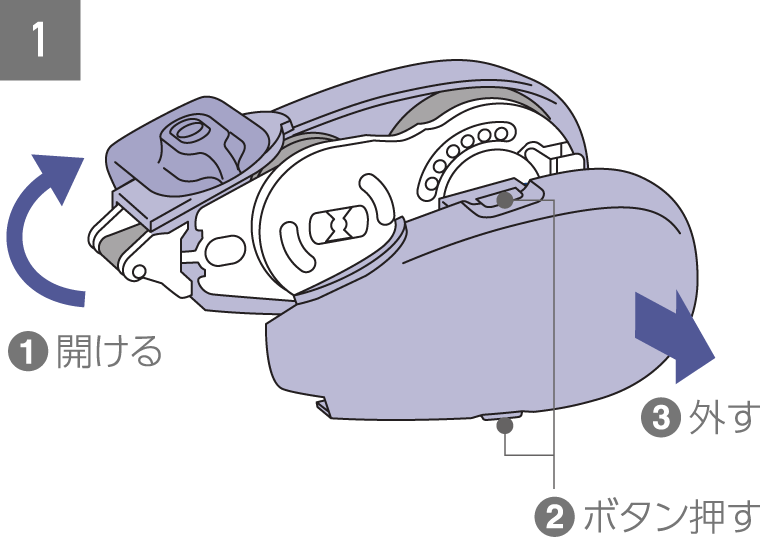
❶ Open the cap towards the back of the illustration, ❷ press the top and bottom buttons, and ❸ remove the cover in the direction of the arrow.
-
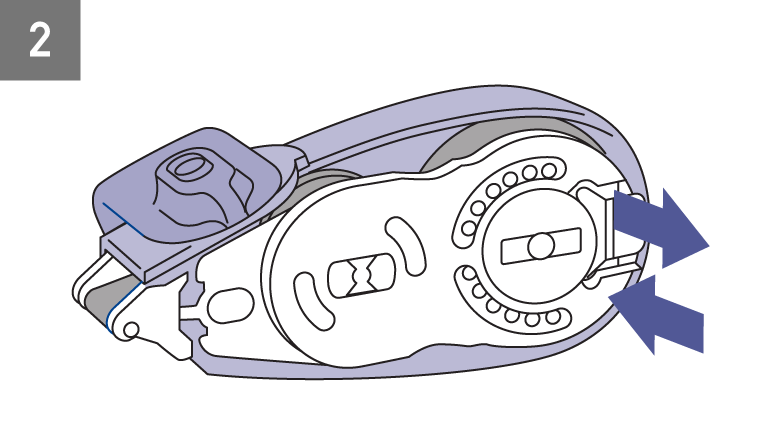
Remove the used tape and set a new refill tape. -
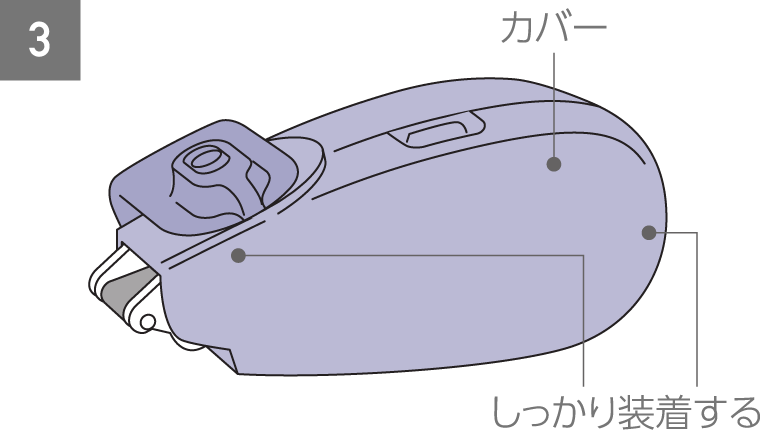
Please use with the cover firmly attached.
*If the cover is not completely attached, it may cause a malfunction.
If the tape is slack
*Please be careful not to let the tape stick to each other or get tangled while working.
*If it sticks or gets tangled, please stop working and untie it before proceeding.
*Wear and tear on the main unit may cause the tape to sag, so please replace the main unit with a new one after approximately 10 refill tapes.
-
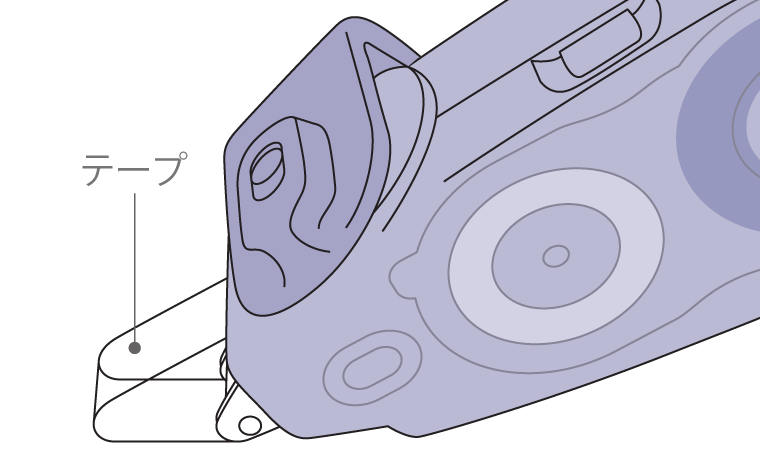
If the tape sags, stop gluing it for now.
-
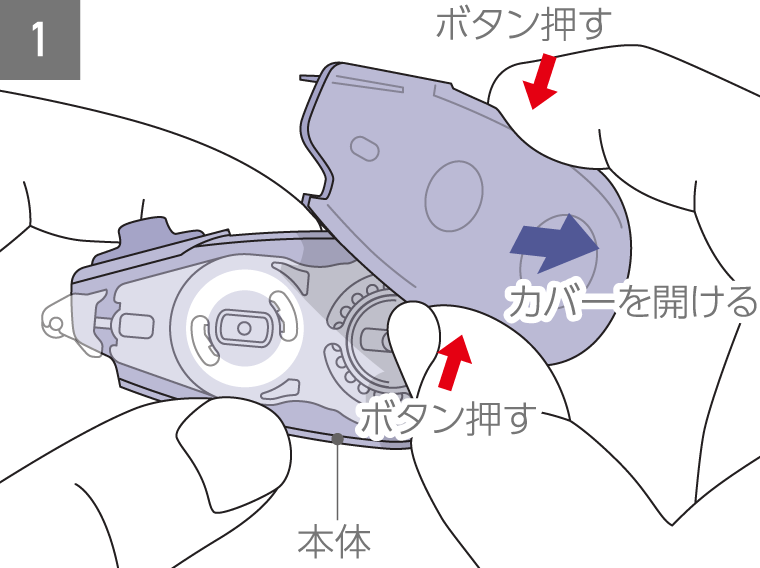
Leave the tape as is and open the cover while pressing the "button" on the main unit. -
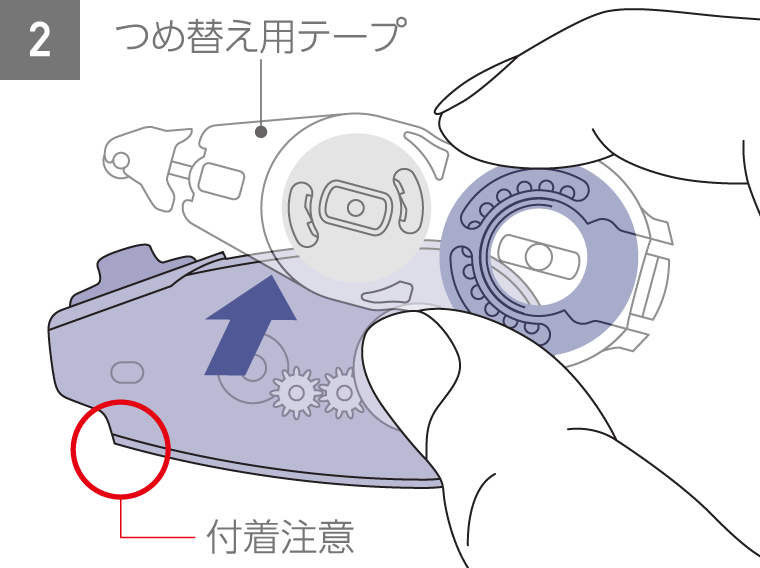
Be careful not to stick the tape to the main unit and remove the replacement tape straight. -
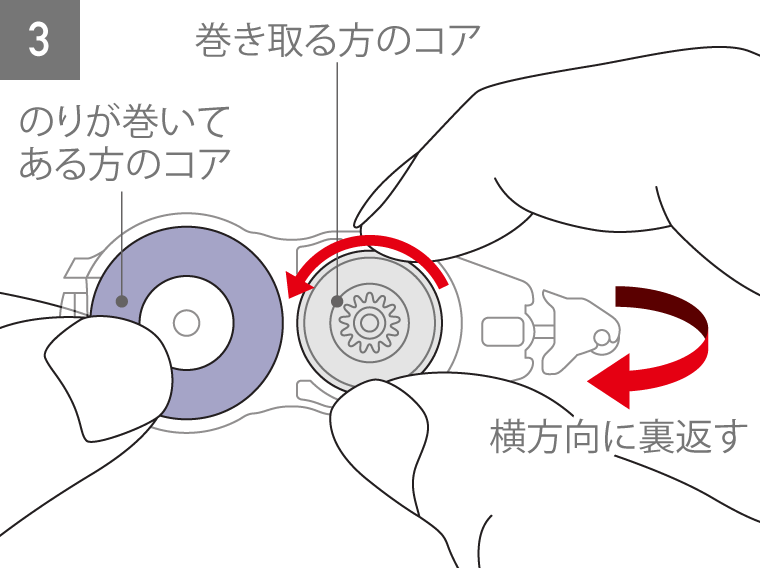
Turn the refill tape over sideways. While holding the core with the adhesive tape wound around it, slowly rotate the take-up core counterclockwise to remove any slack in the tape. -
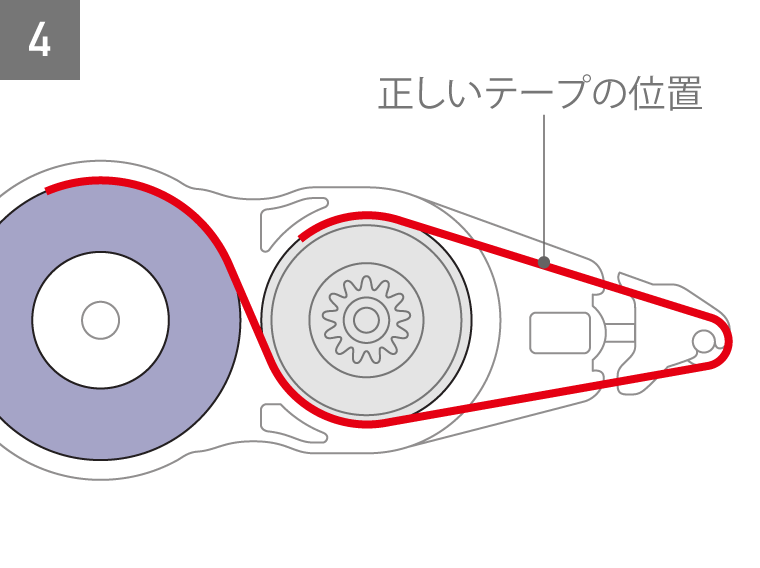
Make sure that the tape is taut and does not slack, then set the refill tape into the main unit.
DOT LINER Compact
Support Information

Storng Adhesive
TA- DM4500-08NB
Storng Adhesive (heart pattern)
TA- DM4550-08N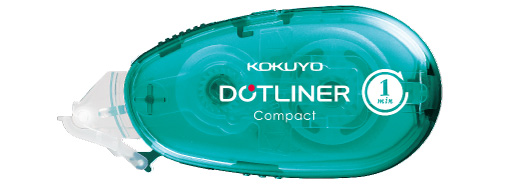
For printing/attaching later
TA- DM4520-08NB
Removable Adhesive
TA- DM4510-08N
The strikethrough products is no longer in production. Thank you for your continued patronage.
List of refill tapes
- TA- D4500-08N (Storng Adhesive)
- TA- D4500-08NX3-1P ( 〃 Pack of 3)
- TA- D4550-08N (heart pattern)
- TA- D4520-08N (for printing/sticking later)
- TA- D4510-08N (Removable Adhesive)
Other than the above part numbers and refill tape
For compatibility, please see the PDF below
How to use
-
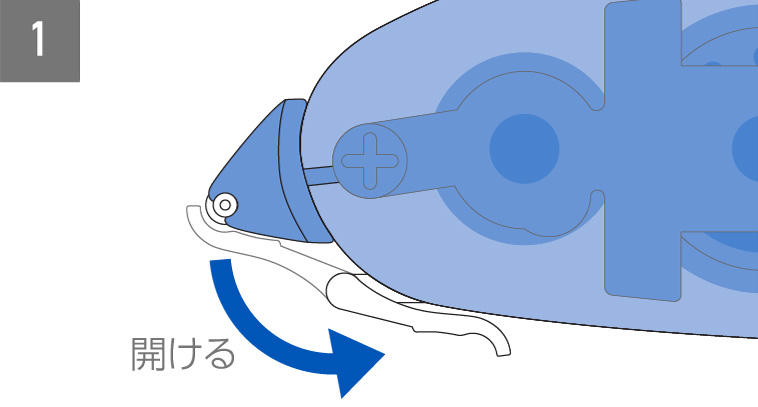
Open the cap and secure it to the bottom of the main unit. -
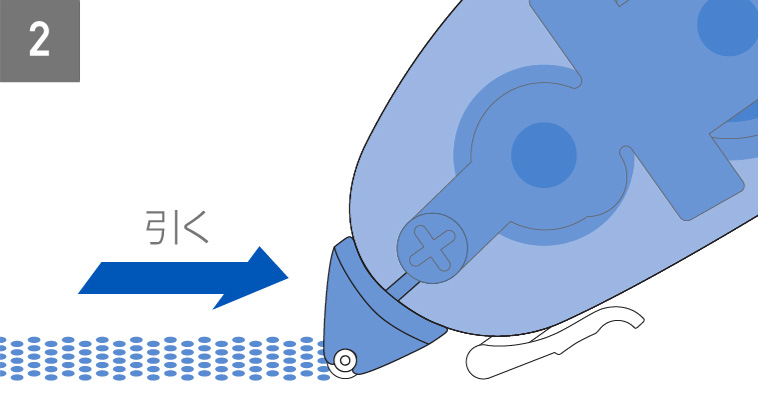
Glue will be transferred when you slowly pull it straight backwards.
How to refill
-
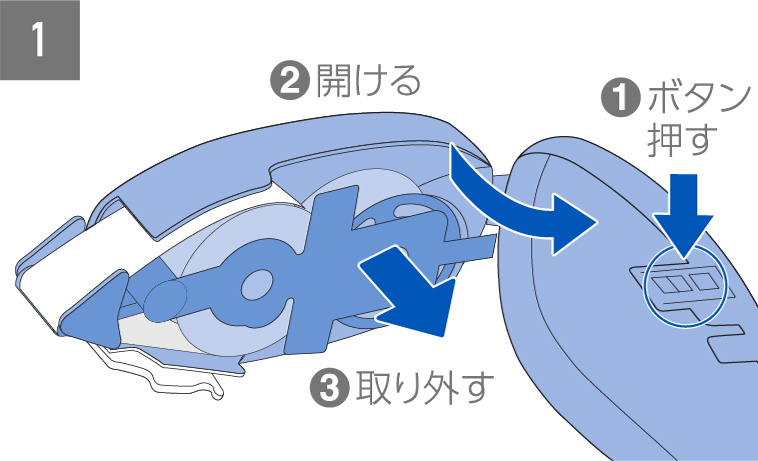
While pressing the button ❶, open the cover in the direction indicated by❷ and remove the used tape as shown in ❸ -
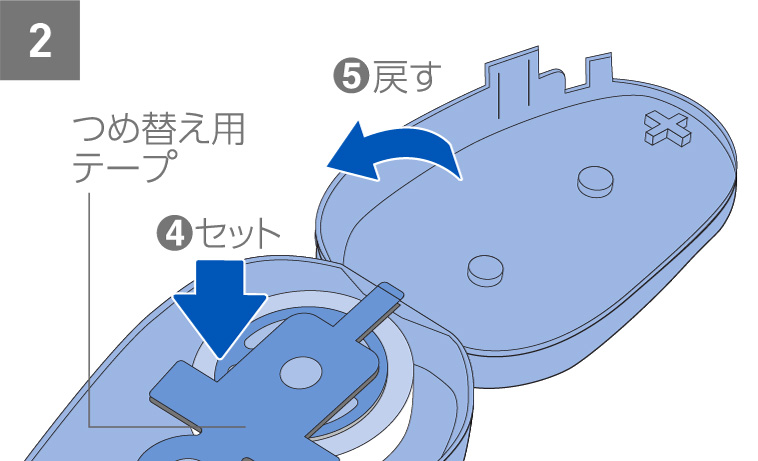
❹ After installing the new refill tape, ❺ close the cover and resume use.
If the tape is slack
*Please be careful not to let the tape stick to each other or get tangled while working.
*If it sticks or gets tangled, please stop working and untie it before proceeding.
*Wear and tear on the main unit may cause the tape to sag, so please replace the main unit with a new one after approximately 10 refill tapes.
-
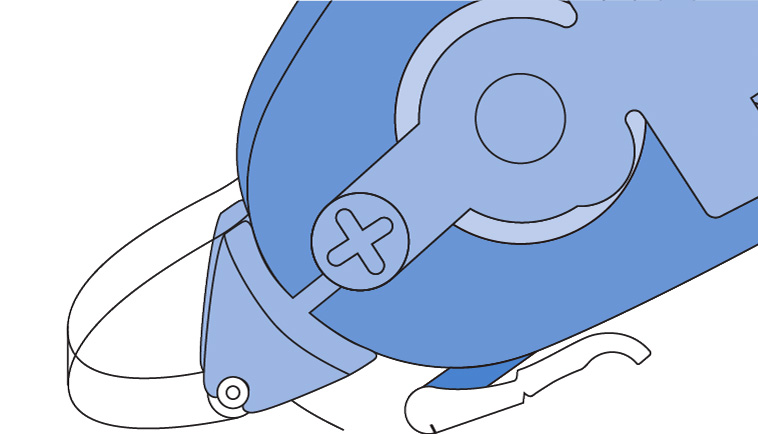
If the tape sags, stop gluing it for now.
-
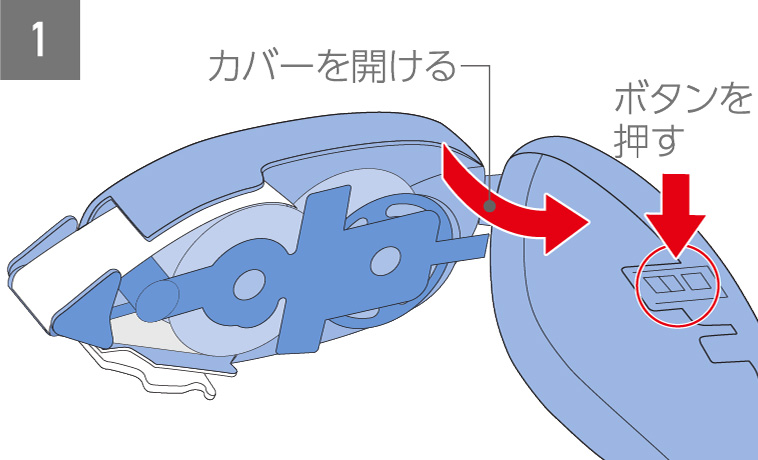
Leave the tape as is and open the cover while pressing the "button" on the main unit. -
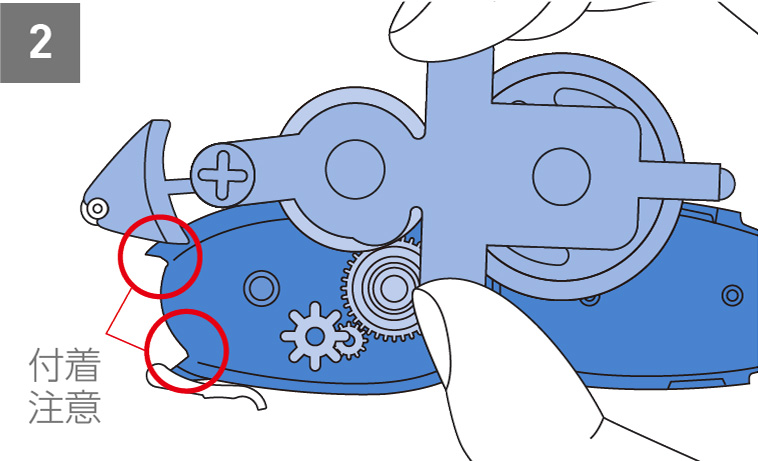
Be careful not to stick the tape to the main unit and remove the replacement tape straight. -
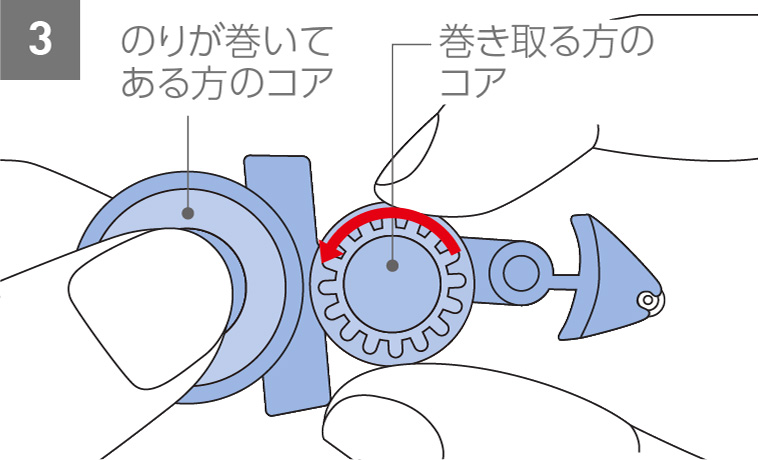
Turn the refill tape over sideways. While holding the core with the adhesive tape wound around it, slowly rotate the take-up core counterclockwise to remove any slack in the tape. -
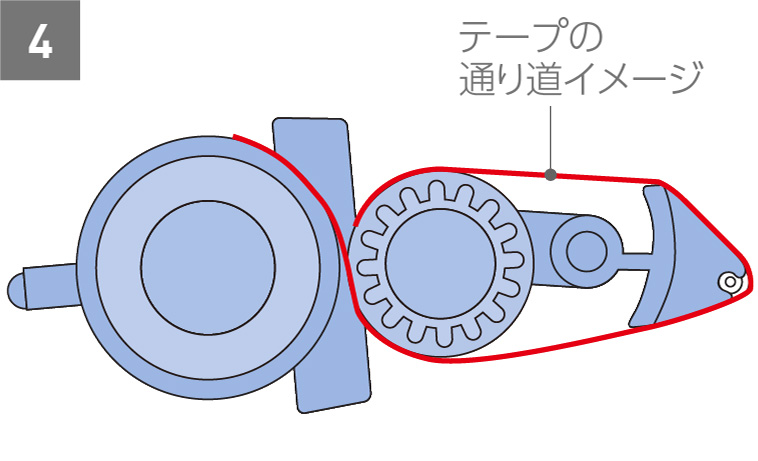
Make sure that the tape is taut and does not slack, then set the refill tape into the main unit.
DOT LINER Knock
Support Information
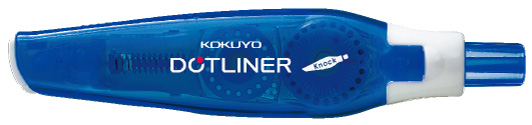
Storng Adhesive
TA- DM480-07NB/P
List of refill tapes
- TA-D480-07N
Other than the above part numbers and refill tape
For compatibility, please see the PDF below
How to use
-
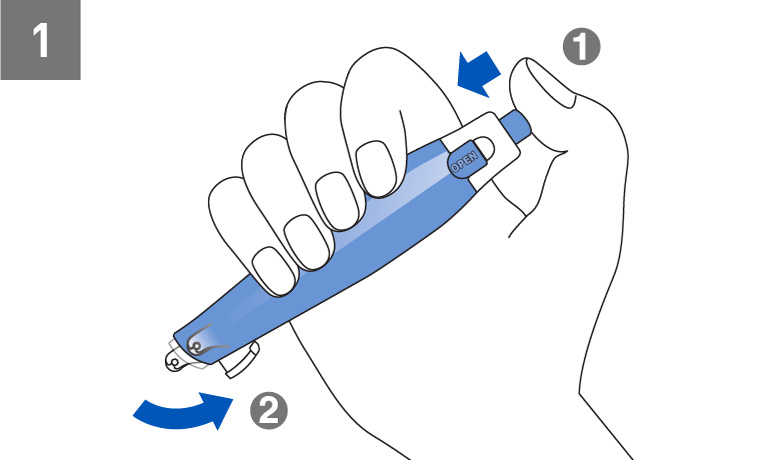
Press the knock button❶, and the cap ❷ rotates open. -
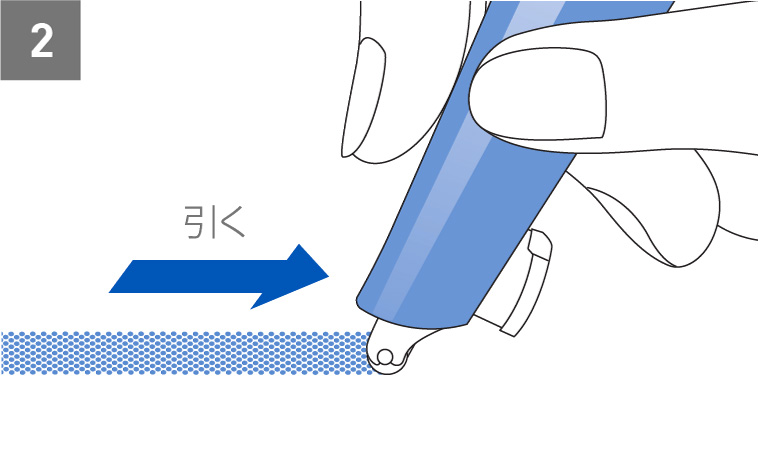
Glue will be transferred when you slowly pull it straight backwards.
How to refill
-
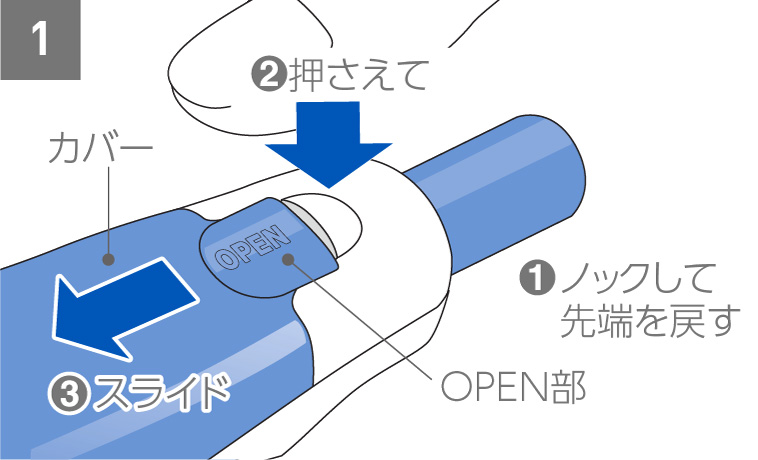
❶ If the cap is open, press the knock button to close it. *It cannot be replaced if the tip is still exposed. ❷ While pressing the “OPEN” part of the cover, ❸ slide the cover in the direction of the arrow to remove it. -
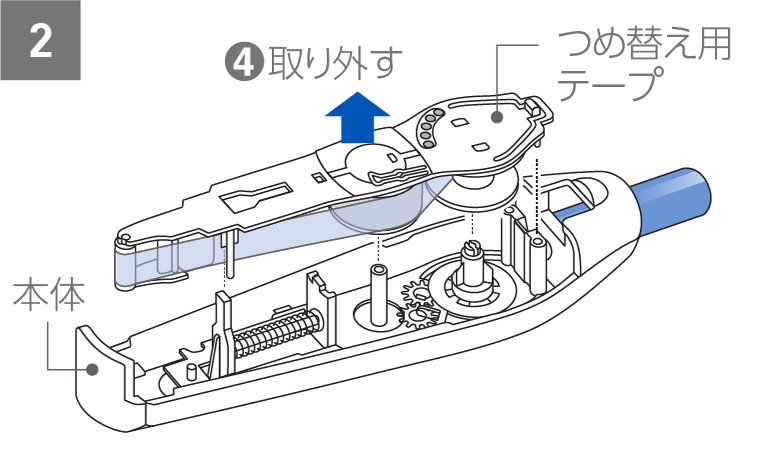
❹ Pull the used tape straight up and remove it. -
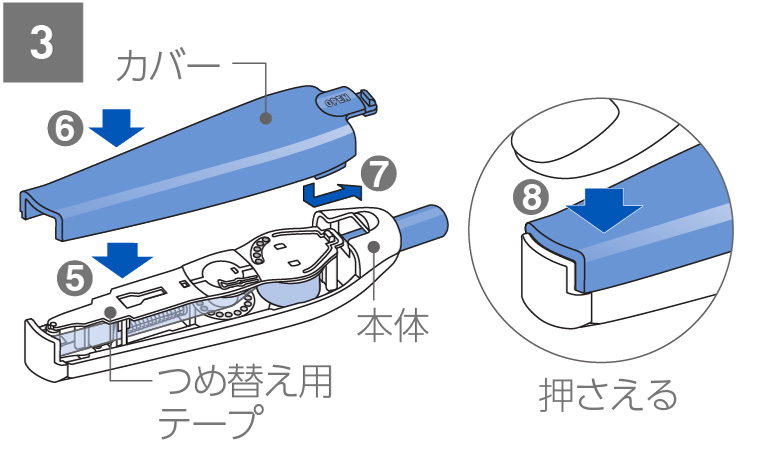
❺Insert the new refill tape securely, ❻Put the cover over the main unit, and ❼slide to secure it to the main unit. If there is a gap at the tip, press ❽ to close the cover.
If the knock does not work or the cap does not open
-
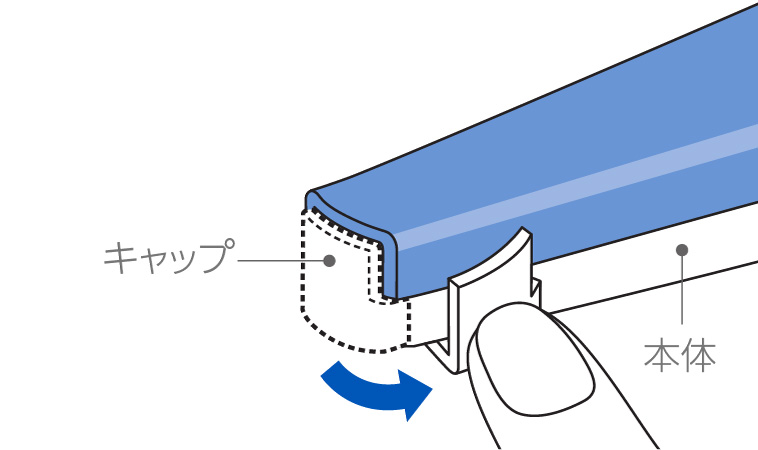
Turn the cap by hand in the direction of the arrow to release the lock.
If the tape is slack
*Please be careful not to let the tape stick to each other or get tangled while working.
*If it sticks or gets tangled, please stop working and untie it before proceeding.
*Wear and tear on the main unit may cause the tape to sag, so please replace the main unit with a new one after approximately 10 refill tapes.
-
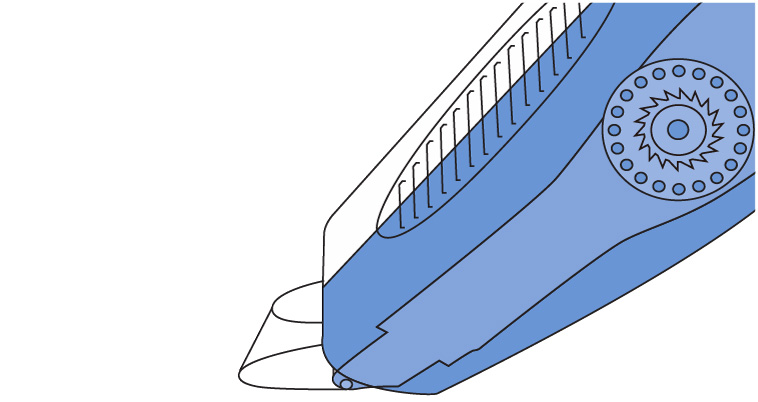
If the tape sags, stop gluing it for now. -
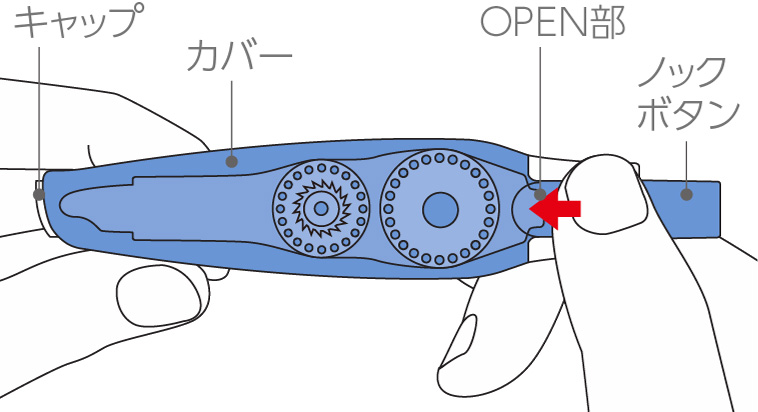
Leave the tape in place and press the knock button to close the cap. Remove the cover by pressing the OPEN part of the cover and sliding it.
[In case of small slack]
-
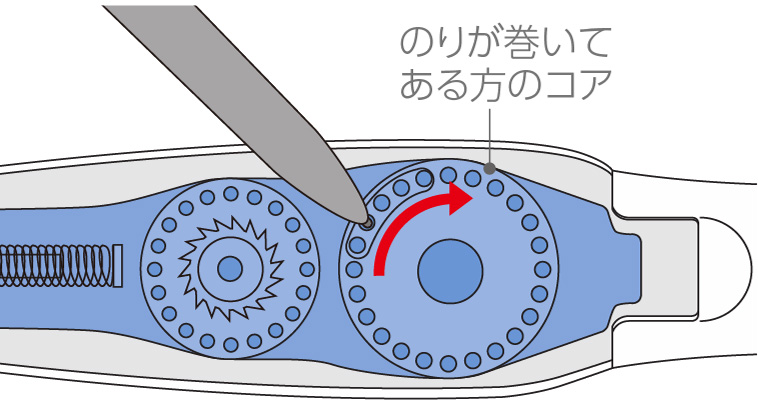
Place the tip of a pen or similar object into the groove and turn the core around which the glue is wrapped clockwise to take up any slack.
[In the case of significant sagging]
-
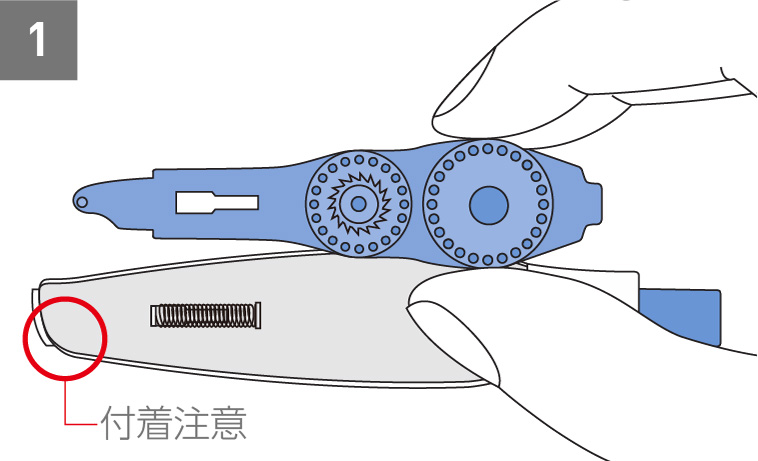
Be careful not to stick the tape to the main unit and remove the replacement tape straight. -
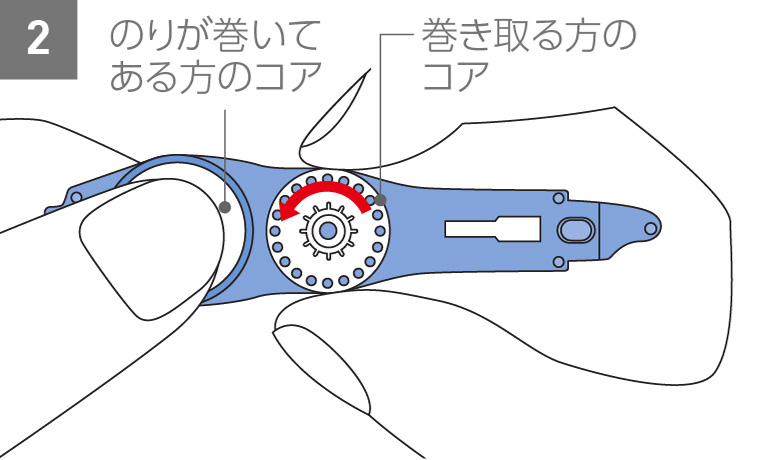
Turn the refill tape over sideways. While holding the core with the adhesive tape wound around it, slowly rotate the take-up core counterclockwise to remove any slack in the tape. -
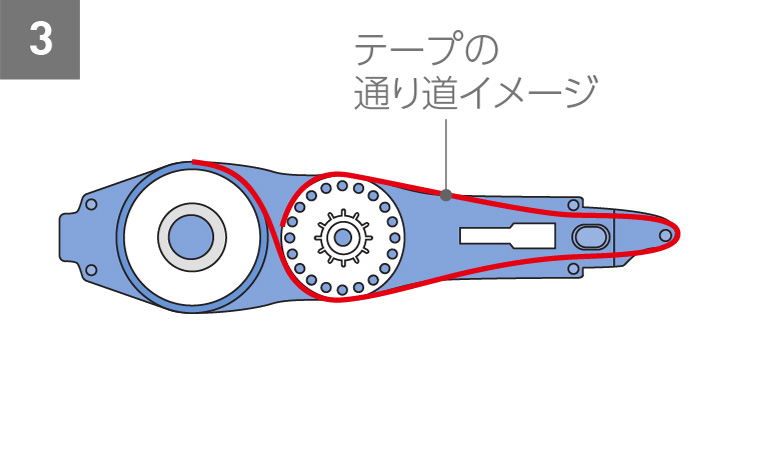
Make sure that the tape is taut and does not slack, then set the refill tape into the main unit.
DOT LINER Stamp
Support Information
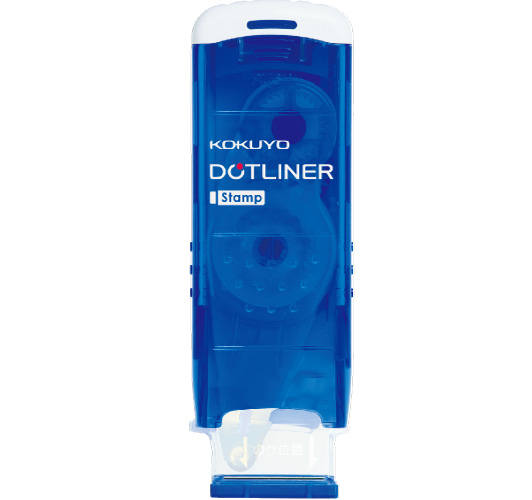
Storng Adhesive
TA- DM460-08
List of refill tapes
- TA-D460-08
Other than the above part numbers and refill tape
For compatibility, please see the PDF below
How to use (push and glue)
-
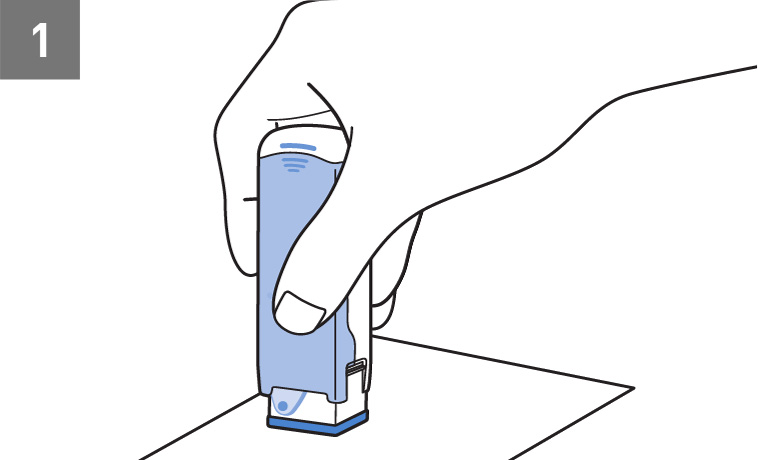
Grasp the main unit from above and place it vertically on the gluing area. -
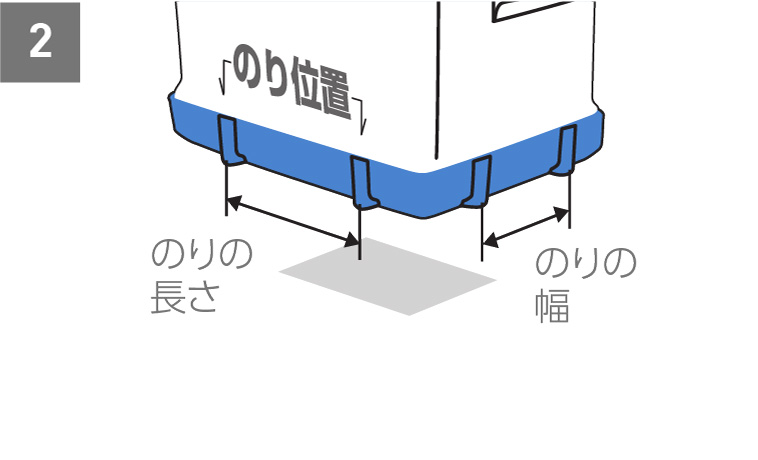
Align the position where you want to glue with the protrusion of the cap tip. -
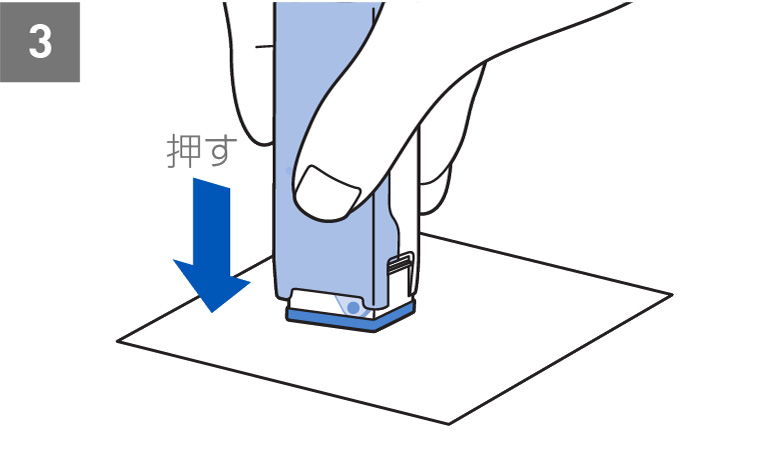
If you press down slowly vertically as if stamping, you can glue it 600 times* with a size of approximately 8.4 x 10 mm (width x length). (The length may be reduced by approximately 1 to 2 mm.) *This is a design value and not a guaranteed value.
How to use (pull and glue)
-
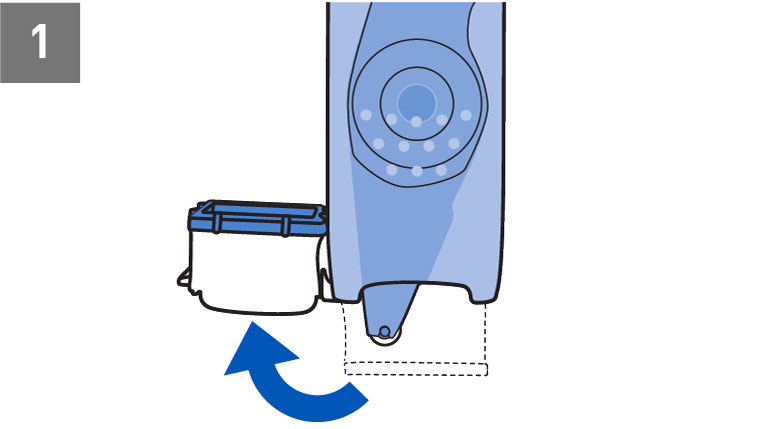
Open the cap. -
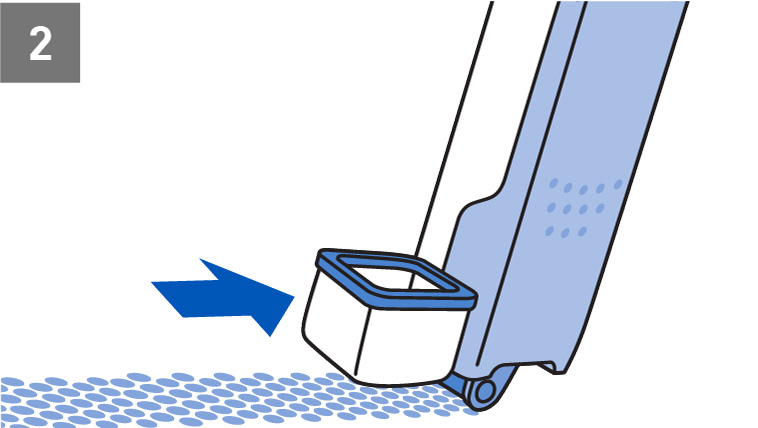
Place the tip on the area you want to glue and pull it straight and slowly to transfer the tape glue.
How to refill
-
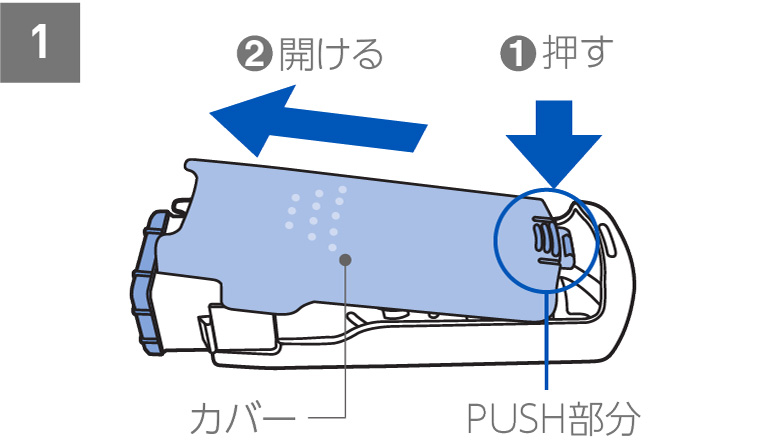
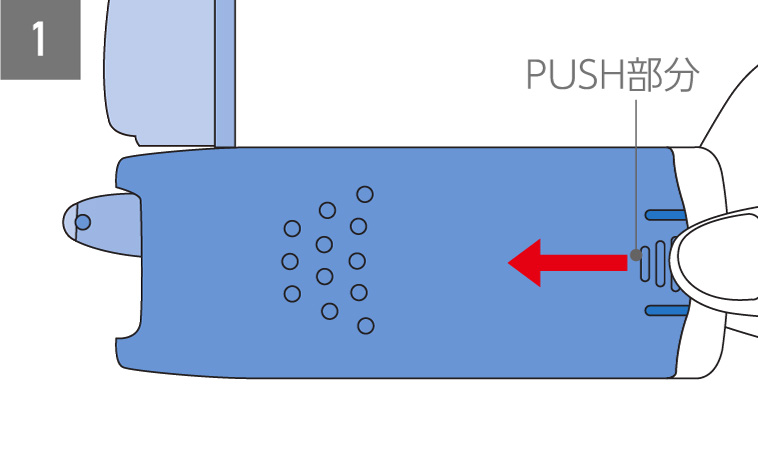
Push "PUSH part" ❶ and open the cover in direction ❷. -
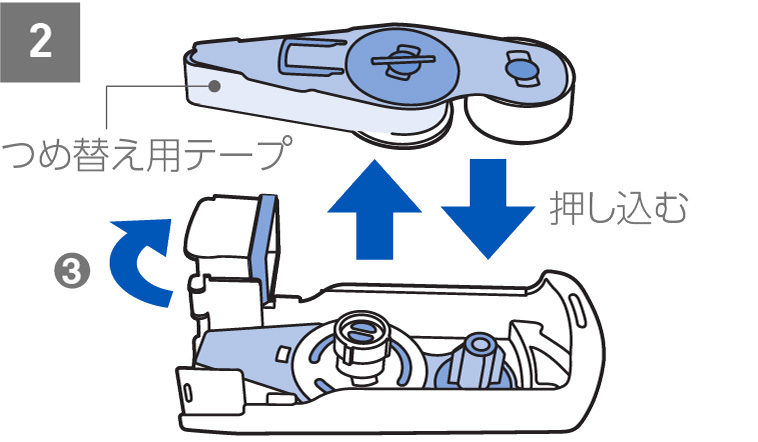
❸Open the cap and replace the refill tape. If the refill tape is floating, reinsert it again and make sure it is set securely. -
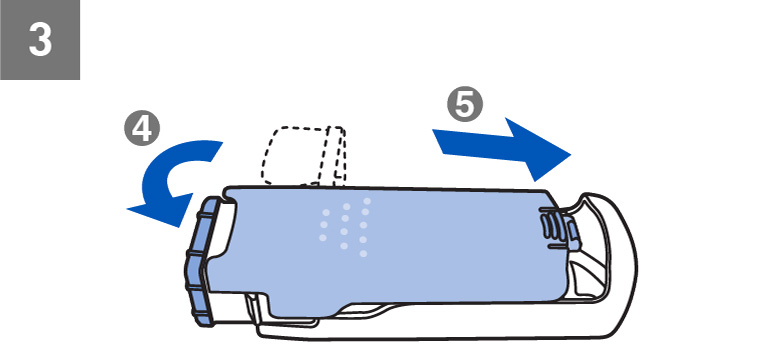
❹ Close the cap slowly and ❺ return the cover to use.
If the tape does not come out properly
-
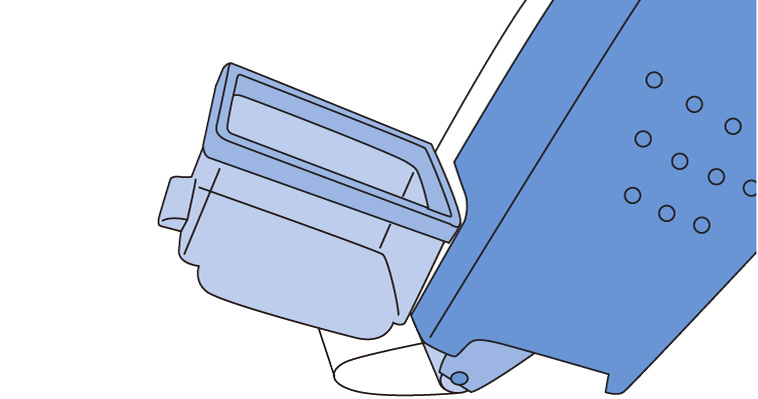
If the tape does not come out well, stop gluing for a moment.
-
Leave the tape as is and remove the cover by pressing the PUSH part of the main unit and sliding it. -
Remove the refill tape straight away. -
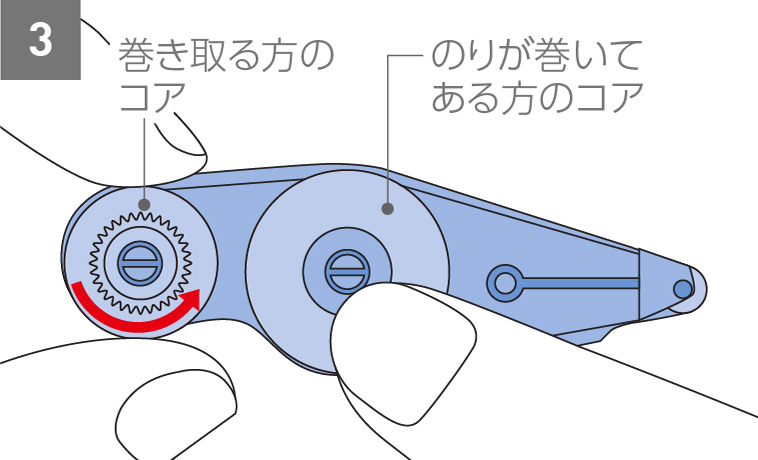
Turn the refill tape over sideways. While holding the core with the adhesive tape wound around it, slowly rotate the take-up core counterclockwise to remove any slack in the tape. -
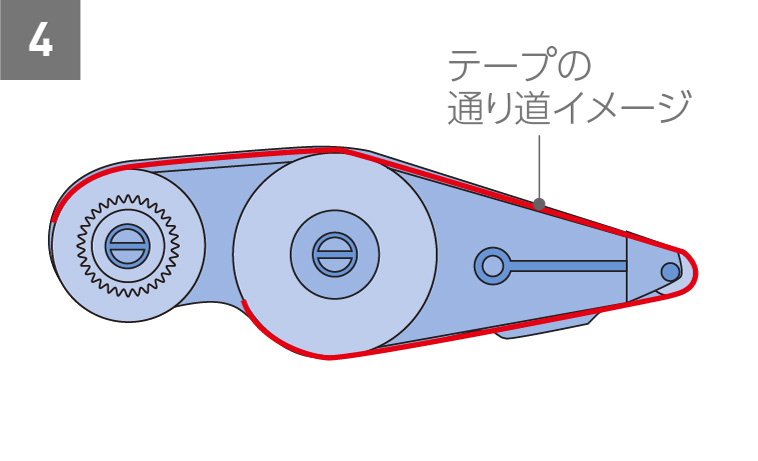
Be careful not to stick the tape to the main unit and remove the replacement tape straight.
DOT LINER Fits
Support Information
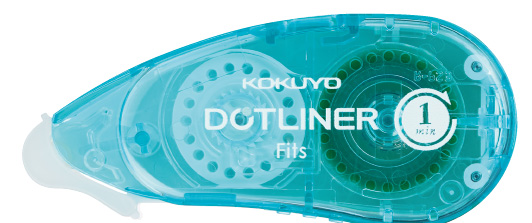
For printing/attaching later
TA- DM490-07NB/P
This products is no longer in production. Thank you for your patronage over the years.
List of refill tapes
- TA- D490-07N
Other than the above part numbers and refill tape
For compatibility, please see the PDF below
How to use
-
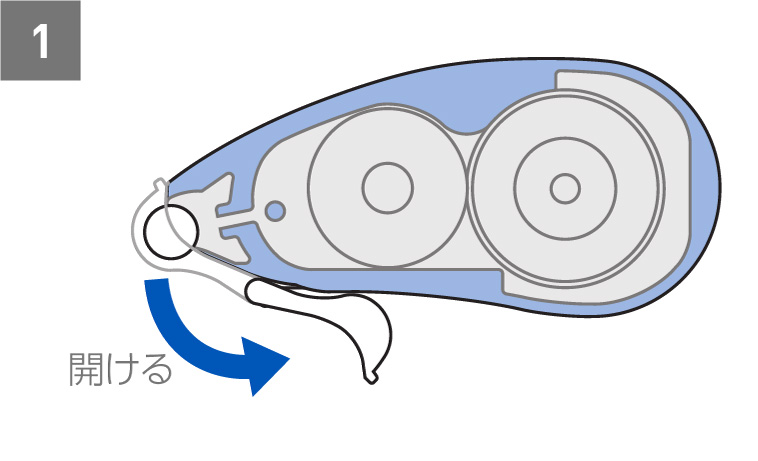
Open the cap and secure it to the bottom of the main unit. -
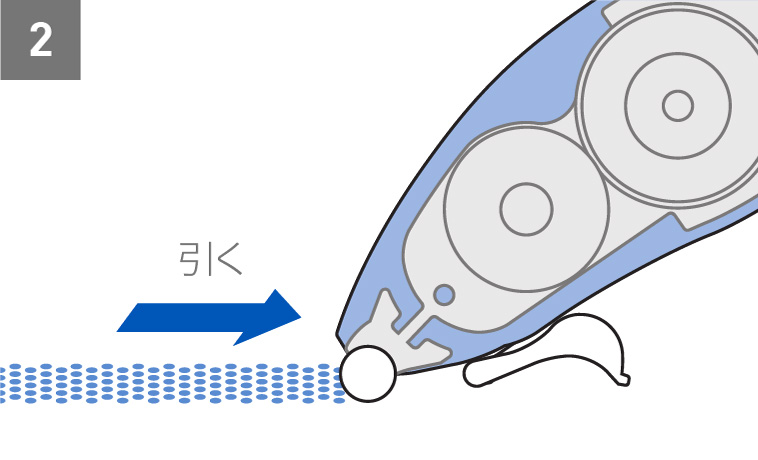
Glue will be transferred when you slowly pull it straight backwards.
How to refill
-
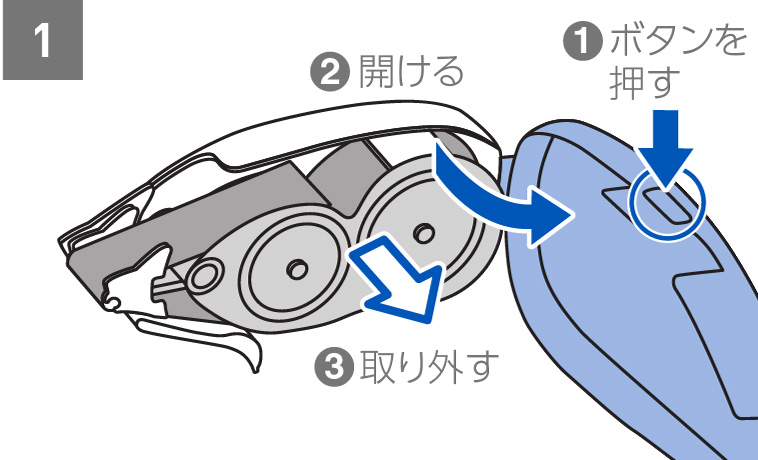
While pressing the button ❶, open the cover in the direction indicated by❷ and remove the used tape as shown in ❸ -
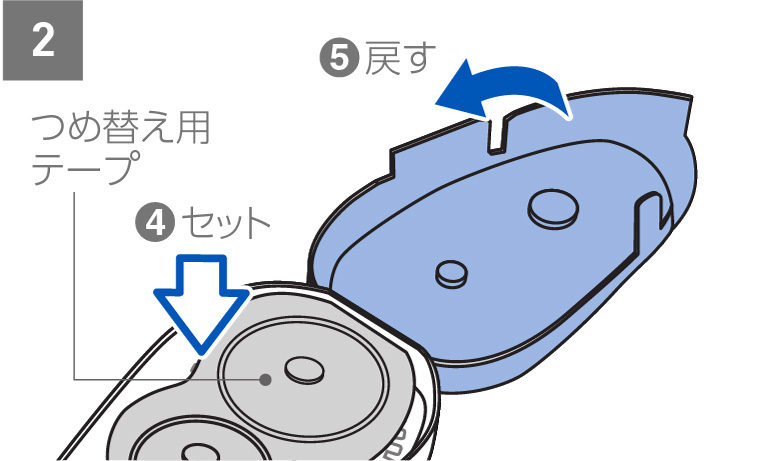
❹ After installing the new refill tape, ❺ close the cover and resume use.
If the tape is slack
*Please be careful not to let the tape stick to each other or get tangled while working.
*If it sticks or gets tangled, please stop working and untie it before proceeding.
*Wear and tear on the main unit may cause the tape to sag, so please replace the main unit with a new one after approximately 10 refill tapes.
-
If the tape sags, stop gluing it for now. -
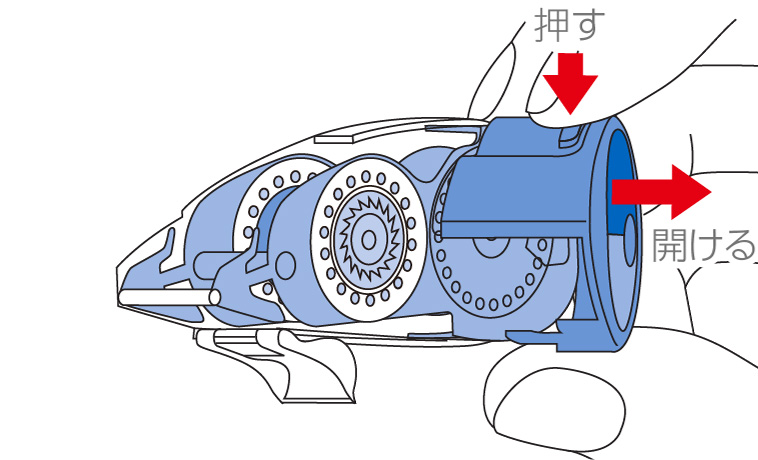
Leave the tape as is and remove the cover by pressing the PUSH part of the main unit and sliding it.
[In case of small slack]
-
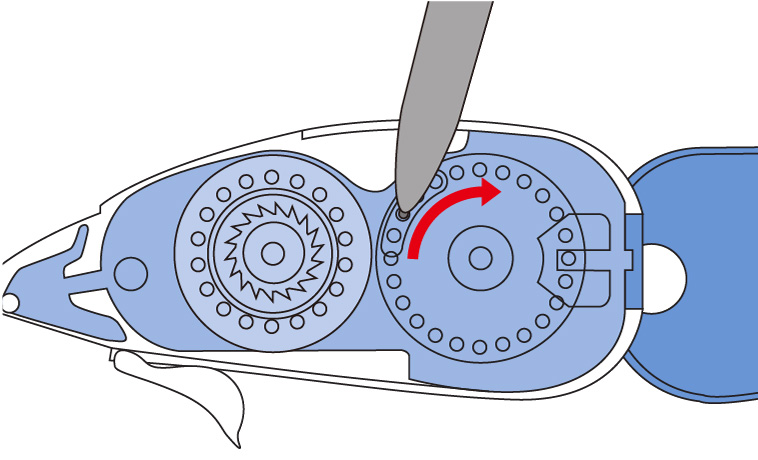
Place the tip of a pen or similar object into the groove and turn the core around which the glue is wrapped clockwise to take up any slack.
[In the case of significant sagging]
-
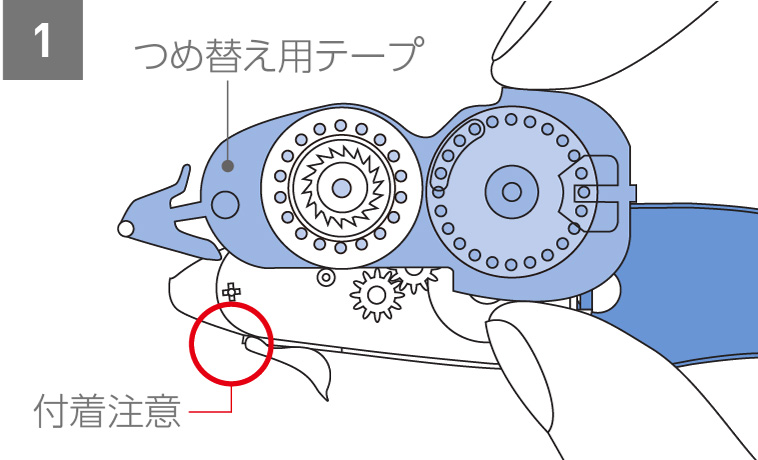
Be careful not to stick the tape to the main unit and remove the replacement tape straight. -
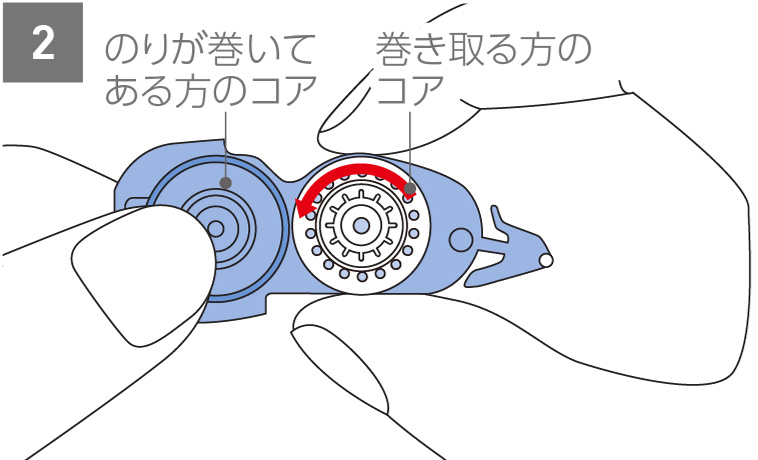
Turn the refill tape over sideways. While holding the core with the adhesive tape wound around it, slowly rotate the take-up core counterclockwise to remove any slack in the tape. -
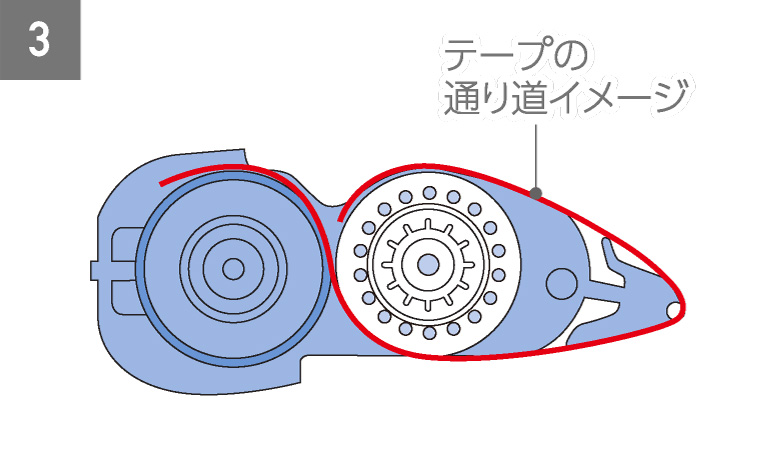
Make sure that the tape is taut and does not slack, then set the refill tape into the main unit.
DOT LINER Petit More
Support Information
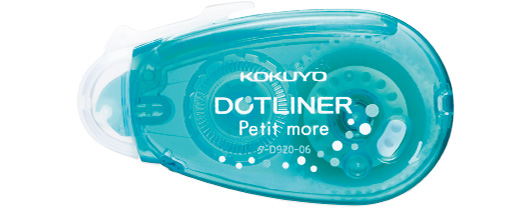
Storng Adhesive
TA- D920-06LB/P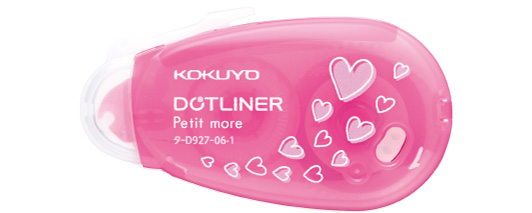
Storng Adhesive (heart pattern)
TA- D927-06-1
This products is a single-use type.
Tape cannot be refilled
How to use
-
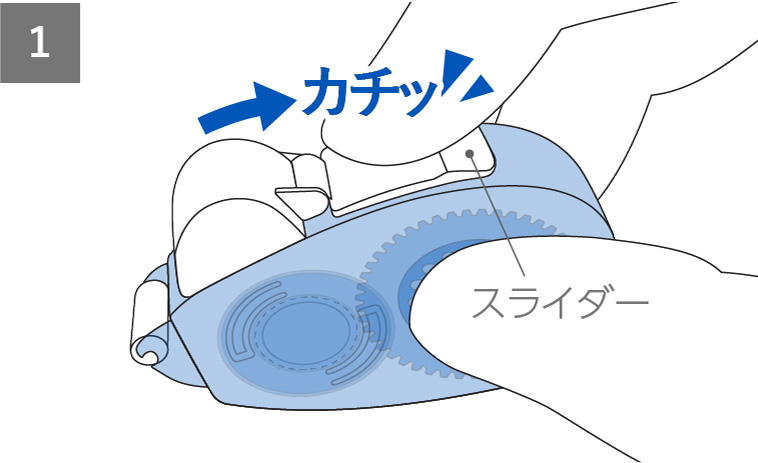
Slide the slider in the direction of the arrow until it clicks and secure it. -
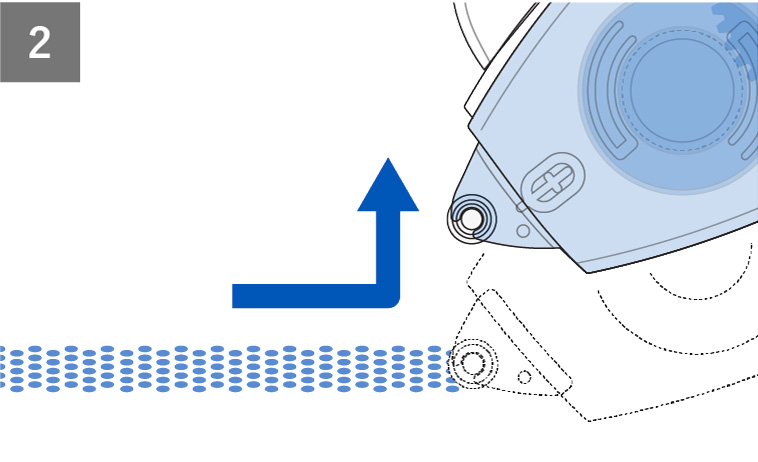
Glue will be transferred when you slowly pull it straight backwards. At the end of the pull, lift it straight up. -
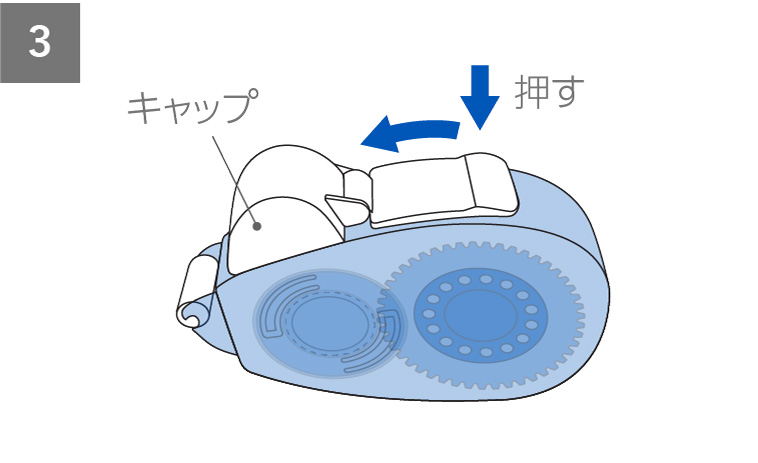
When you finish using it, press the back of the slider and slide it in the direction of the arrow to close the cap.
*Do not press the cap to close it.
If the tape is slack
*Please be careful not to let the tape stick to each other or get tangled while working.
*If it sticks or gets tangled, please stop working and untie it before proceeding.
-
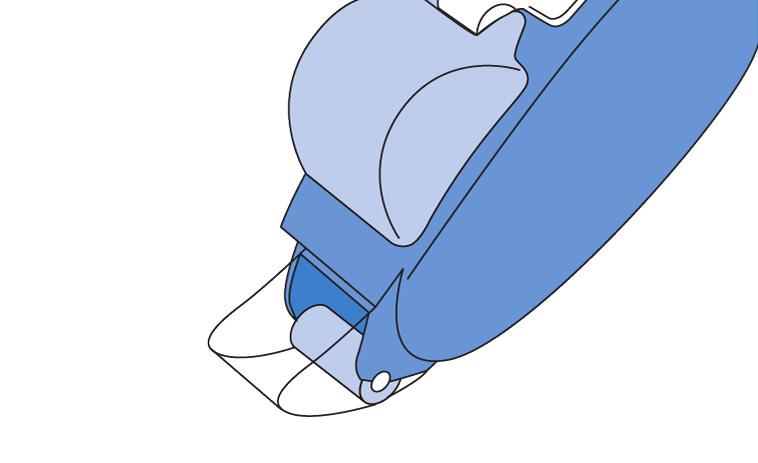
If the tape sags, stop gluing it for now. -
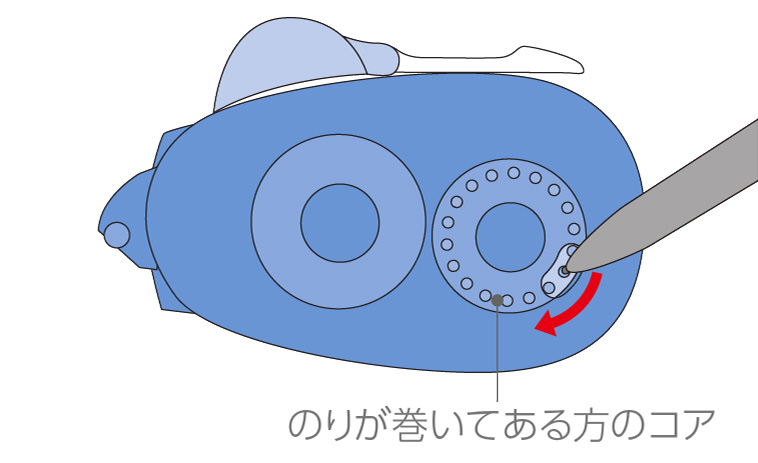
Place the tip of a pen or similar object into the groove and turn the core around which the glue is wrapped clockwise to take up any slack.
DOT LINER Small
Support Information
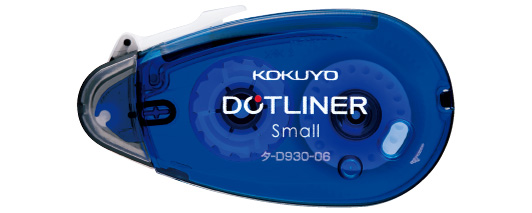
Storng Adhesive
TA- D930-06B
This products is a single-use type.
Tape cannot be refilled
How to use
-
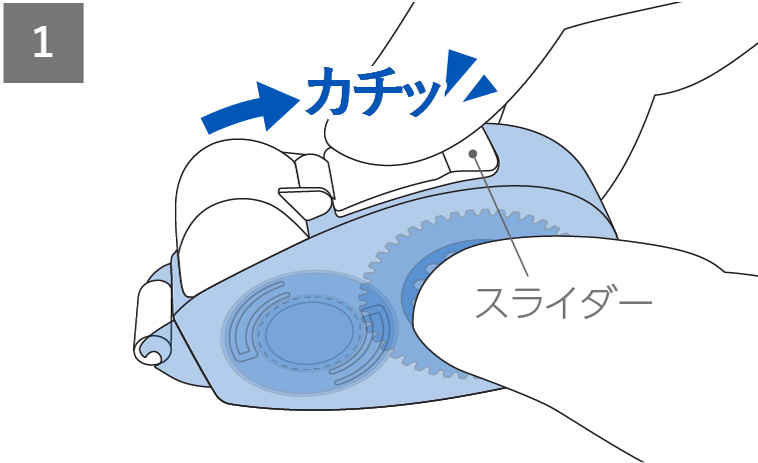
Slide the slider in the direction of the arrow until it clicks and secure it. -
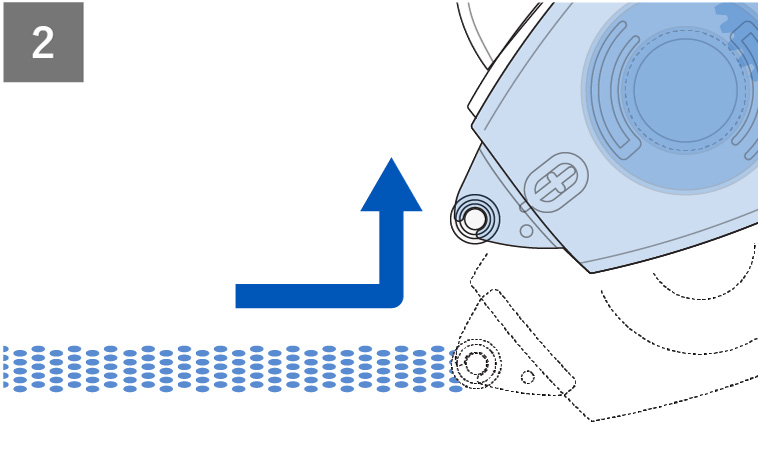
Glue will be transferred when you slowly pull it straight backwards. At the end of the pull, lift it straight up. -
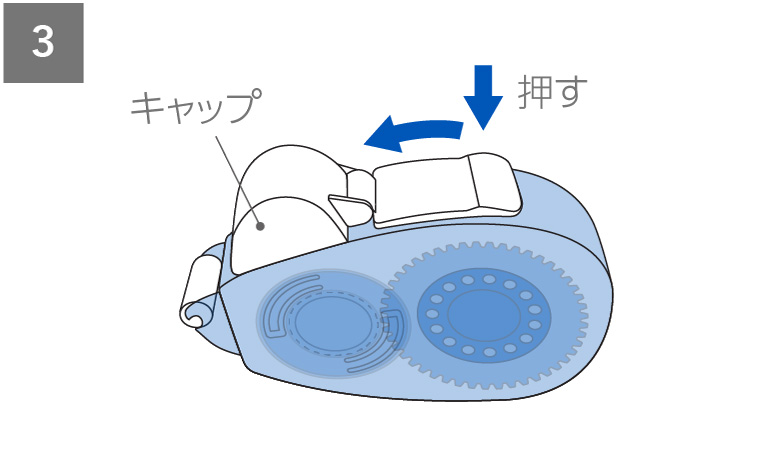
When you finish using it, press the back of the slider and slide it in the direction of the arrow to close the cap. *Do not press the cap to close it.
If the tape is slack
*Please be careful not to let the tape stick to each other or get tangled while working.
*If it sticks or gets tangled, please stop working and untie it before proceeding.
-
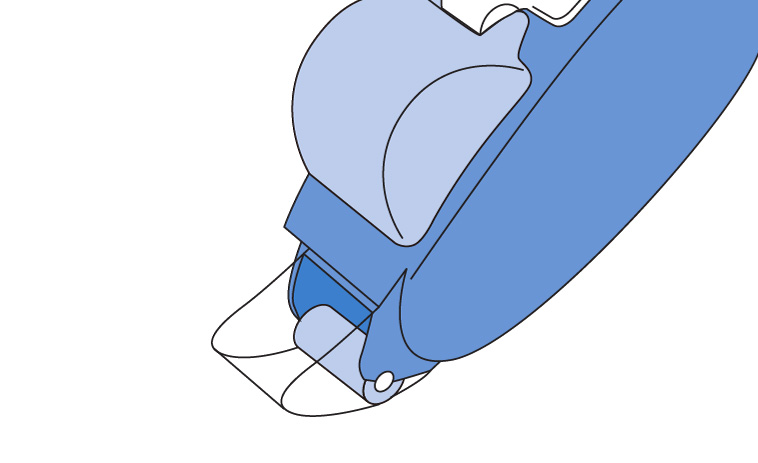
If the tape sags, stop gluing it for now. -
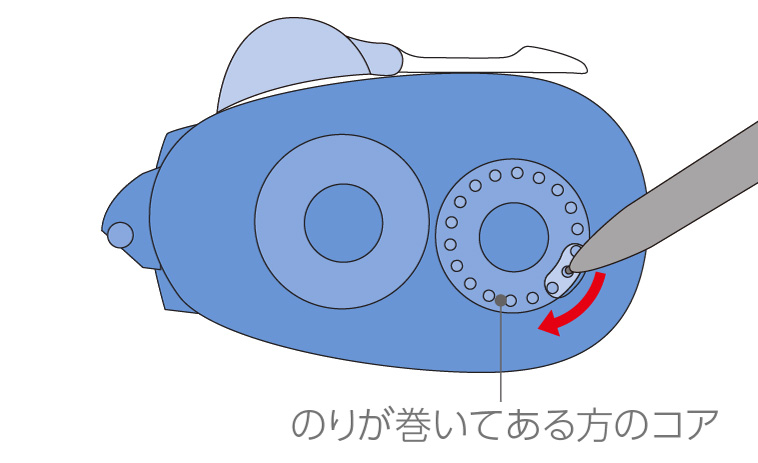
Place the tip of a pen or similar object into the groove and turn the core around which the glue is wrapped clockwise to take up any slack.
DOT LINER Stick
Support Information
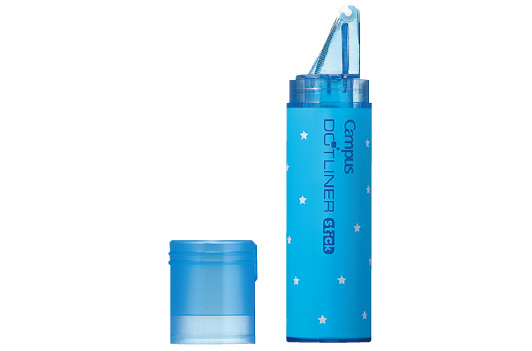
Storng Adhesive
TA- D900-06B/P
This products is a single-use type.
Tape cannot be refilled
This products is no longer in production. Thank you for your patronage over the years.
How to use
-
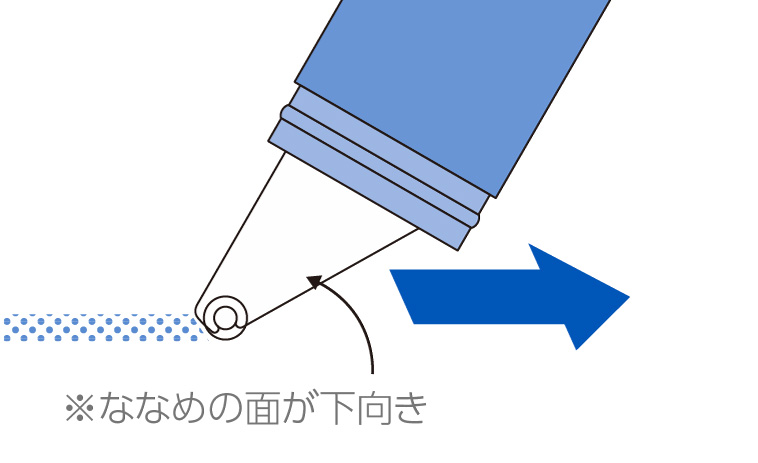
Remove the cap, place the tip on it and slowly pull it backwards.
If the tape is slack
*Please be careful not to let the tape stick to each other or get tangled while working.
*If it sticks or gets tangled, please stop working and untie it before proceeding.
-
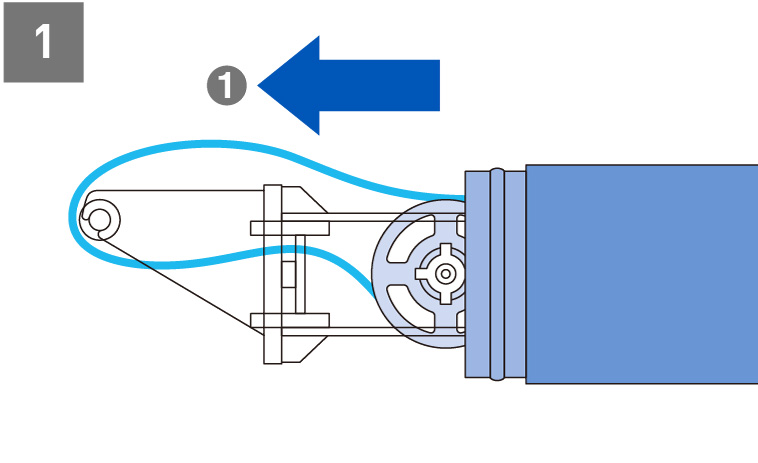
Pull the tip in direction ❶ to remove the inner case. -
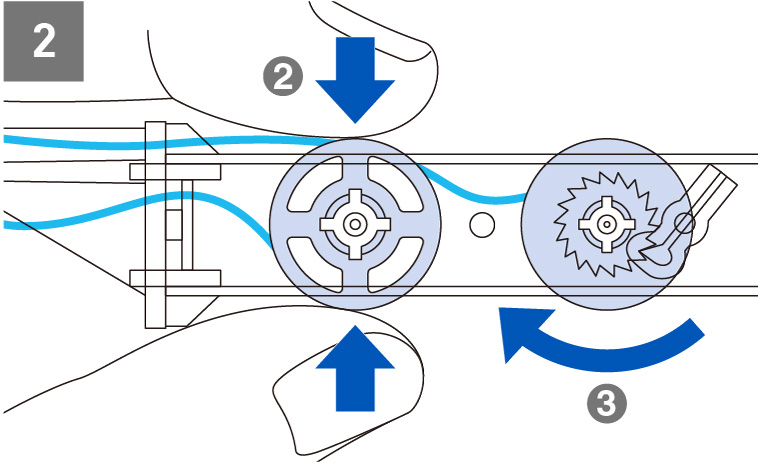
Turn ❸ while holding ❷.


